
Harvest Warmth: The Art of Roasted Vegetable Soup Bliss
Autumn’s harvest lends itself to slow, tactile cooking. Roasting concentrates sugars, builds savory depth, and produces the caramelized edges that define a memorable bowl.
- Roast first: caramelization creates flavor the stove can’t mimic.
- Layer textures: balance sweet squash with earthy roots and bright acid.
- Finish gently: coconut milk or stock-based thinning protects texture and flavor.
- Make-ahead friendly: soup often improves after a day of resting.
Introduction and Flavor Focus
This recipe turns humble roots and squash into a velvety, aromatic soup using high-heat roasting, careful seasoning, and purposeful finishing. I write from years of teaching professional kitchens; small technique shifts make large sensory gains.
We emphasize three building blocks: strong caramelization, balanced liquid ratios, and a finishing acid to lift sweetness. Those moves deliver the signature warmth readers expect from true roasted vegetable soup.
Prep and Cook Time
The timeline below helps you plan oven and stove work so vegetables hit the blender at peak flavor. Roast time will vary slightly with piece size and oven calibration; factor that into your schedule.
Use the timing to stagger salad or bread prep so the whole meal finishes together.
- Preparation: 20 minutes
- Roasting: 35–40 minutes
- Simmering and Blending: 25 minutes
- Total Time: about 1 hour 20 minutes
Yield
This batch yields about six generous bowls suitable for family service or for meal prep across several lunches. Volume will concentrate slightly if chilled, so expect thicker texture on the second day.
Scale easily: double vegetables and broth for larger gatherings; adjust blending capacity or work in batches for safety.
- Serves 6 generous bowls
Difficulty Level
Intermediate—this recipe asks for temperature control, even roasting, and confident blending. The techniques are straightforward but require attention to timing and seasoning.
For cooks new to roasting, the Ultimate Guide to Roasting Vegetables covers pan spacing and heat strategies in detail.
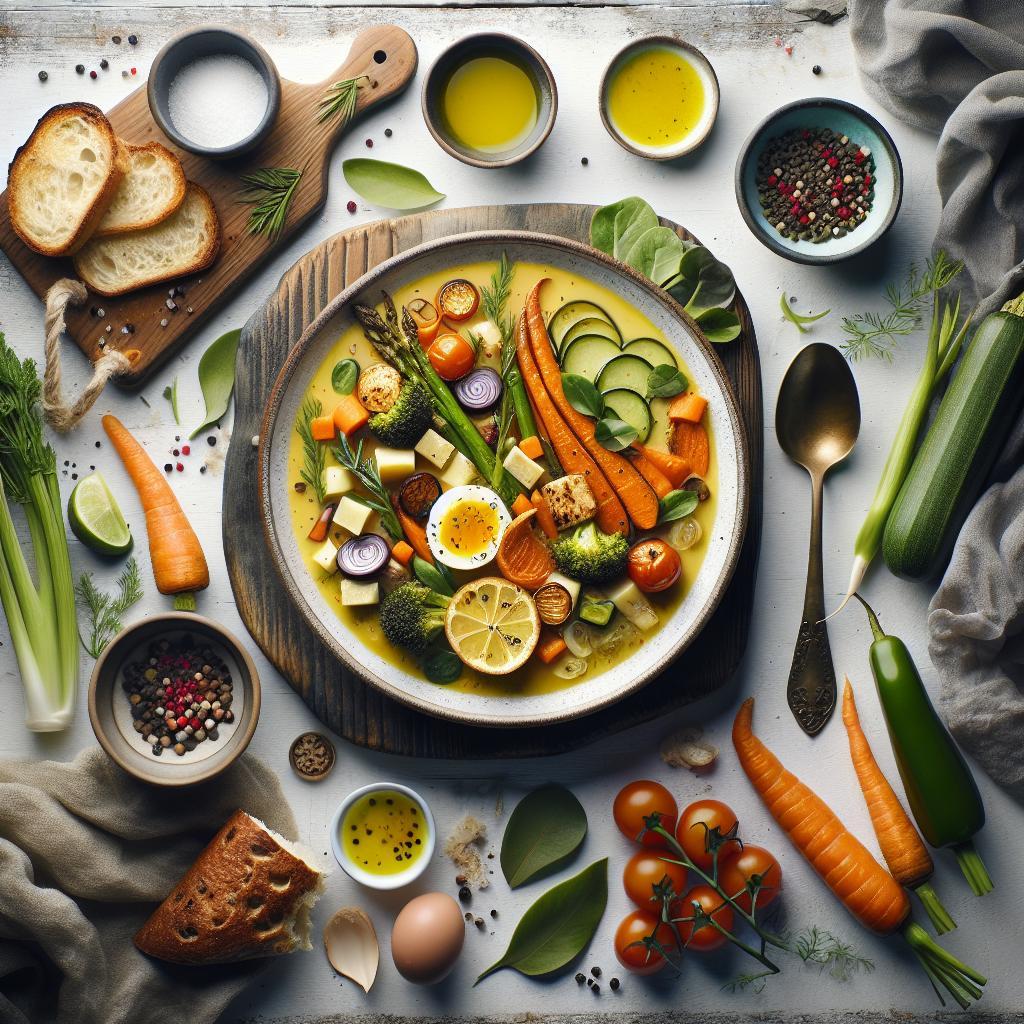
Ingredients
Choose fresh, firm vegetables. Firmness and even piece size ensure uniform caramelization and predictable texture after blending.
Pick a quality low-sodium broth to control final salt levels; see the notes on liquid balance below.
- 4 cups assorted root vegetables, peeled and chopped (butternut squash, carrots, sweet potatoes, parsnips)
- 2 tablespoons olive oil, plus extra for drizzling
- 1 large yellow onion, quartered
- 4 cloves garlic, whole and unpeeled
- 1 teaspoon smoked paprika
- 1 teaspoon ground cumin
- Salt and freshly ground black pepper to taste
- 4 cups vegetable broth, preferably low sodium
- 1 cup canned coconut milk (optional for extra silkiness)
- 2 tablespoons fresh thyme leaves, chopped
- 1 tablespoon apple cider vinegar (to brighten flavors)
- Chopped fresh parsley or chives for garnish
Instructions
Follow order: roast, simmer, blend, finish. That order preserves texture and extracts concentrated flavor from browning reactions.
Read through steps fully before starting; mise en place speeds the process and prevents last-minute corrections.
- Preheat your oven to 425°F (220°C). Toss chopped root vegetables, quartered onion, and whole garlic cloves with oil, smoked paprika, cumin, salt, and pepper. Arrange in a single layer to promote even browning.
- Roast the vegetables. Roast 35–40 minutes, turning once, until deeply caramelized. The browned surfaces come from caramelization, a chemical change that concentrates flavor.
- Extract the garlic. Once cool enough, squeeze roasted garlic from skins into a large pot. The roasted garlic becomes sweet and spreads without harsh sulfur notes.
- Add roasted vegetables and broth. Add roasted vegetables and 4 cups vegetable broth, then bring to a gentle simmer. Simmer 8–10 minutes so flavors marry; avoid rapid boiling to preserve the aromatics.
- Blend for texture. Use an immersion blender for control or work in batches in a countertop blender. Blend to a smooth consistency and return to the pot; adjust thickness with extra broth if necessary.
- Finish and season. Stir in coconut milk and apple cider vinegar, heat gently for 5 minutes, and adjust salt and pepper. A small acid lift brightens the natural sweetness and balances the bowl.
- Serve with garnish. Ladle hot soup into bowls, drizzle olive oil, and garnish with thyme and toasted seeds for texture contrast.
Roasting details
Space pieces so hot oven air circulates; crowded pans steam rather than brown. Use two trays if needed.
Rotate trays halfway through to even out temperature zones. Aim for uniform 1–1.5 inch pieces for consistent doneness.
Blending and finishing
Immersion blenders preserve mouthfeel and reduce clean-up; countertop blenders produce very smooth texture but handle hot liquid with care. Vent lids and blend in batches.
Finish by tasting for salt, acid, and fat balance. A touch of vinegar or lemon brightens; a spoon of coconut milk or olive oil rounds mouthfeel.
Allow soup to settle for a few minutes before final taste adjustments. Temperature affects perception of sweetness and seasoning.
Tips for Success
Small technique shifts yield more consistent results. Pay attention to cut size, oven temp, and pan spacing.
Use these practical tips to replicate the bowl you tasted in class or at a restaurant.
- Choose vegetables thoughtfully: Mix sweeter squash like butternut squash with earthier parsnips for balance.
- High heat matters: 425°F promotes Maillard and roasting reactions—don’t under-temp the oven.
- Strain for silk: For restaurant-level smoothness, push blended soup through a fine mesh sieve.
- Make-ahead: Soup often improves after refrigeration; reheat gently and adjust seasoning before serving.
Serving Suggestions
Serve piping hot with contrasting textures: toasted seeds, crusty bread, or a bright herb oil lift the bowl from good to memorable.
Pair with a simple salad or grain to turn the soup into a complete meal. Use a small spoon of yogurt or coconut cream to add visual and textural contrast.
For plating guidance, review our internal notes on finishing techniques at Making Silky Soup Techniques and seasonal pairings at Seasonal Harvest Recipes.
Nutrition Snapshot
This soup provides a balance of complex carbohydrates and small amounts of protein and fat when made with vegetable broth and minimal oil. Use low-sodium broth to control total sodium per serving.
Estimate per serving values below as a guide; values will vary by exact vegetable mix and added fats.
| Nutrient | Per Serving |
|---|---|
| Calories | 190 kcal |
| Protein | 4 g |
| Carbohydrates | 33 g |
| Fat | 6 g |

Common Questions (FAQ)
What makes roasted vegetable soup different from boiled vegetable soup?
Roasting induces Maillard and caramelization reactions that deepen flavor and build roasted aromas. Boiling extracts soluble flavors but lacks the browned complexity produced by dry heat.
Texturally, roasted vegetables often yield a fuller mouthfeel because concentrated sugars and softened fibers blend into a richer puree.
Which vegetables roast best for a fall soup?
Firm-root vegetables and winter squashes perform best; they tolerate high heat and concentrate natural sugars. Think carrots, parsnips, sweet potato, and butternut squash.
Leafy or watery vegetables like spinach or zucchini are better added later or roasted separately to avoid excess moisture in the pan.
How can I keep the soup creamy without dairy?
Use starchy vegetables like potato or squash as the base and finish with coconut milk or a nut-based cream for silkiness. Emulsify fat with hot liquid to integrate smoothly.
Straining the blended soup through a fine sieve removes remaining fiber and raises perceived creaminess with no added dairy.
Can I freeze roasted vegetable soup?
Yes. Cool quickly, portion into airtight containers, and freeze for up to 3 months. Thaw overnight in the refrigerator and reheat gently, whisking to reincorporate any separated fats.
Avoid freezing with dairy-based creams fully emulsified; instead, add coconut milk or yogurt after thawing to preserve texture.
How should leftovers be stored?
Store cooled soup in airtight containers in the refrigerator for up to four days. Reheat gently and adjust seasoning; a splash of broth restores body if it thickens.
For longer storage, freeze in single-serve portions so you can thaw only what you need without waste.
Cook confidently: roast with purpose, blend with care, and finish with an acid to balance sweetness. These steps create consistent, repeatable results that celebrate harvest produce.
See also: roasted soup


