There’s something undeniably magical about the warm, hearty aroma of freshly baked rye bread wafting through your kitchen-an invitation to slow down, savor, and share. In this guide, Rustic Delight: Your Ultimate Homemade Rye Bread Guide, we’ll delve into the soulful craft of transforming simple ingredients into a loaf that’s as rich in flavor as it is in tradition. Whether you’re a seasoned baker or a curious beginner, join us on a journey through time-honored techniques, insider tips, and the subtle nuances that make rye bread a beloved staple in rustic kitchens worldwide. Prepare to roll up your sleeves and fill your home with the unmistakable comfort of homemade rye bread.
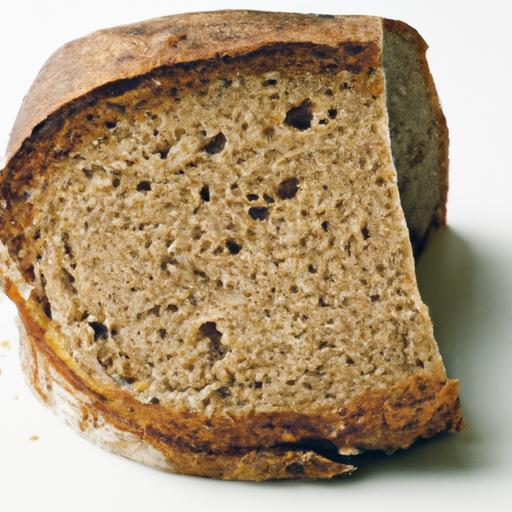
Rustic rye bread has long captured the heart of traditional baking tables with its robust, earthy flavor and satisfyingly chewy texture. Embracing the art of crafting this bread blends the heritage of Northern European roots with hands-on mastery of dough and baking techniques, promising a loaf that’s as soulful as it is delicious. Whether it’s your first time or a return journey to homemade breadmaking, this guide will walk you through every step toward a beautifully rustic rye loaf.
Prep and Cook Time
- Preparation: 30 minutes
- Resting and Proofing: 3 hours
- Baking: 35-40 minutes
- Total Time: Approximately 4 hours 10 minutes
Yield
- Servings: 12 slices (1 medium loaf)
Difficulty Level
- Intermediate: Some experience with yeast and dough handling recommended
Ingredients
- 350g rye flour, sifted
- 150g bread flour (for structure)
- 10g active dry yeast
- 10g sea salt
- 320ml lukewarm water (about 105°F / 40°C)
- 1 tbsp molasses (for depth of flavor)
- 1 tbsp caraway seeds (optional, for authentic aroma)
- 2 tsp apple cider vinegar (to enhance acidity and texture)
Instructions
- Activate the Yeast: In a small bowl, dissolve active dry yeast and molasses in lukewarm water. Let it rest until frothy, about 10 minutes – a sign that the yeast is alive and kicking.
- Mix Flours and Salt: In a large mixing bowl, combine rye flour, bread flour, and sea salt. Stir in caraway seeds if using to infuse that classic rye fragrance.
- Blend Wet & Dry: Make a well in the dry ingredients, then pour in the yeast mixture along with apple cider vinegar. Stir gently with a wooden spoon or your hand until a rough dough forms – rye dough is naturally sticky and denser than wheat dough.
- Kneading Mastery: Transfer dough to a lightly floured surface; knead for 8-10 minutes. Rye dough demands patience – knead with moderate pressure to develop gluten without overworking the heavier rye flour.
- First Proof: Shape the dough into a ball and place it into an oiled bowl. Cover with a clean kitchen towel or plastic wrap. Let it rise in a warm spot for 2 hours, until noticeably risen but not doubled.
- Shape and Final Rise: Gently deflate the dough and shape it into a round loaf. Place it on a parchment-lined baking sheet or a floured banneton for that rustic score. Cover and proof for an additional 60 minutes, allowing the dough to develop flavor and texture.
- Preheat and Prepare Your Oven: Preheat the oven to 230°C (450°F), placing a baking stone or heavy tray inside if possible. To create steam, place a shallow pan of water on the bottom rack.
- Score and Bake: Right before baking, score the top of your loaf with a sharp knife or lame to release gases and form a beautiful crust. Transfer to the oven and bake for 15 minutes.
- Lower Temperature and Continue Baking: Reduce heat to 200°C (400°F) and bake an additional 20-25 minutes until the crust turns deep brown and sounds hollow when tapped.
- Cool Completely: Remove from oven and transfer to a wire rack. Allow the loaf to cool entirely before slicing to let the crumb set perfectly.
Tips for Success
- Dough Hydration: Rye flour absorbs more water than wheat, so maintaining proper hydration ensures a moist crumb and true rustic texture.
- Bind Rye with Bread Flour: This combination balances rye’s dense nature with gluten structure for an airy yet chewy bite.
- Proofing Atmosphere: Keep your dough in a warm, draft-free environment. If proofing times extend, the dough flavor develops deeper, enhancing complexity.
- Steam Baking: Injecting steam in the early baking phase creates a shiny, crackling crust – don’t skip this step!
- Make-Ahead: Rye bread slices freeze well. Wrap tightly and toast slices straight from the freezer for fresh-eating delight.
- Variation: Experiment by adding nuts or dried fruits like raisins for an unexpected twist on heritage flavors.
Serving Suggestions: Elevating Your Rye Bread Experience
Slice your beautifully baked rustic rye bread and pair it with a range of deli delights. Spread with creamy goat cheese and fresh herbs, or layer smoked salmon with dill and a squeeze of lemon for an elegant appetizer. A hearty bowl of lentil stew or warming mushroom ragout also complements rye’s deep tones. Garnish with a sprinkle of fresh seeds on top before serving for a touch of texture and visual appeal.
| Nutrient | Per Slice |
|---|---|
| Calories | 120 kcal |
| Protein | 4.5g |
| Carbohydrates | 22g |
| Fat | 1.2g |

Discover more artisan breads for your kitchen adventures in our detailed sourdough bread guide or explore traditional baking practices through King Arthur Baking’s expert guides.
Q&A
Q&A: Rustic Delight – Your Ultimate Homemade Rye Bread Guide
Q1: What makes rye bread “rustic”?
A: The term “rustic” evokes images of hearty, wholesome loaves baked with simple, natural ingredients and a hands-on approach. Rustic rye bread often features a thick, chewy crust, a dense yet tender crumb, and the deep, earthy flavors unique to rye flour. It’s the kind of bread that feels homemade from the first crack of the crust to the last crumb.
Q2: Why choose rye flour over wheat flour for homemade bread?
A: Rye flour provides a distinctive flavor profile-slightly tangy, nutty, and robust-that wheat can’t quite match. Rye also offers health benefits like higher fiber content and beneficial nutrients. Plus, it creates a moister, denser crumb that stays fresh longer, perfect for those who crave a meaningful slice of bread to savor.
Q3: How do I start my rye bread journey at home?
A: Begin by sourcing quality rye flour, preferably whole grain for that full-bodied taste. Simple starter recipes often include a mix of rye and wheat flour to aid fermentation and rise. From there, embrace patience-rye dough tends to be stickier and less elastic, so gentle folding and longer fermentation times are your friends.
Q4: What is the secret to getting that perfect crust on rustic rye bread?
A: Steam is king! Introducing moisture in the first 10-15 minutes of baking encourages crust development, creating a crunchy, crackling exterior. Try placing a tray of water at the bottom of your oven or spritzing the dough with water before baking. Also, baking on a preheated stone or a cast-iron surface helps mimic traditional hearth baking.
Q5: Can I add flavors or ingredients to customize my rye bread?
A: Absolutely! Rustic rye is a versatile canvas. Consider incorporating caraway seeds for a classic twist, or experiment with dried fruits, nuts, or even herbs. Just remember-add-ins should complement, not overwhelm, the rye’s signature earthy goodness.
Q6: How do I store homemade rye bread to keep it fresh?
A: Rye’s natural density and moisture help it stay fresh longer than typical wheat bread. Wrap your loaf in a clean cotton towel or store it in a paper bag at room temperature to maintain crustiness without trapping excess moisture. Avoid plastic bags unless you want a soft crust and quicker staling.
Q7: What dishes pair best with rye bread?
A: Rustic rye shines when paired with robust flavors: smoked fish, sharp cheeses, hearty stews, or even simple butter and honey. It’s a soul-warming companion in sandwiches or a perfect base for open-faced toasts that celebrate savory or sweet toppings.
Q8: How difficult is it to master rye bread baking compared to other breads?
A: Rye bread baking is a delightful challenge. It requires more attention to dough hydration and fermentation since rye behaves differently from wheat. But the rewards-rich flavor, satisfying texture, and a slice of tradition-are well worth the effort. With practice and a bit of patience, your rustic rye loaf will become a cherished kitchen staple.
This Q&A provides a creative yet informative peek into the art of homemade rye bread, guiding readers from beginner questions to flavorful inspiration.
Key Takeaways
As the warm, earthy aroma of your freshly baked rye bread fills the kitchen, you’ll realize that this rustic delight is more than just a loaf-it’s a journey into tradition, flavor, and the simple pleasures of homemade goodness. With each slice, you’re not only savoring a uniquely hearty taste but also connecting with centuries of baking heritage, crafted by your own hands. Whether you’re a seasoned baker or a curious beginner, this ultimate guide to rye bread invites you to embrace the art of slow, soulful baking. So grab your mixing bowl, dust off that flour, and let the magic of homemade rye bread transform your table into a celebration of wholesome comfort. Happy baking!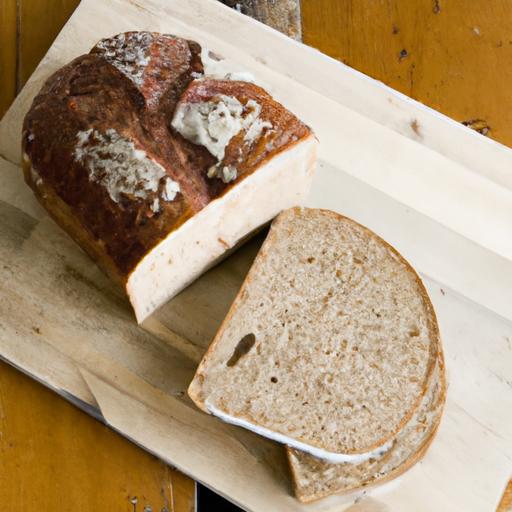


