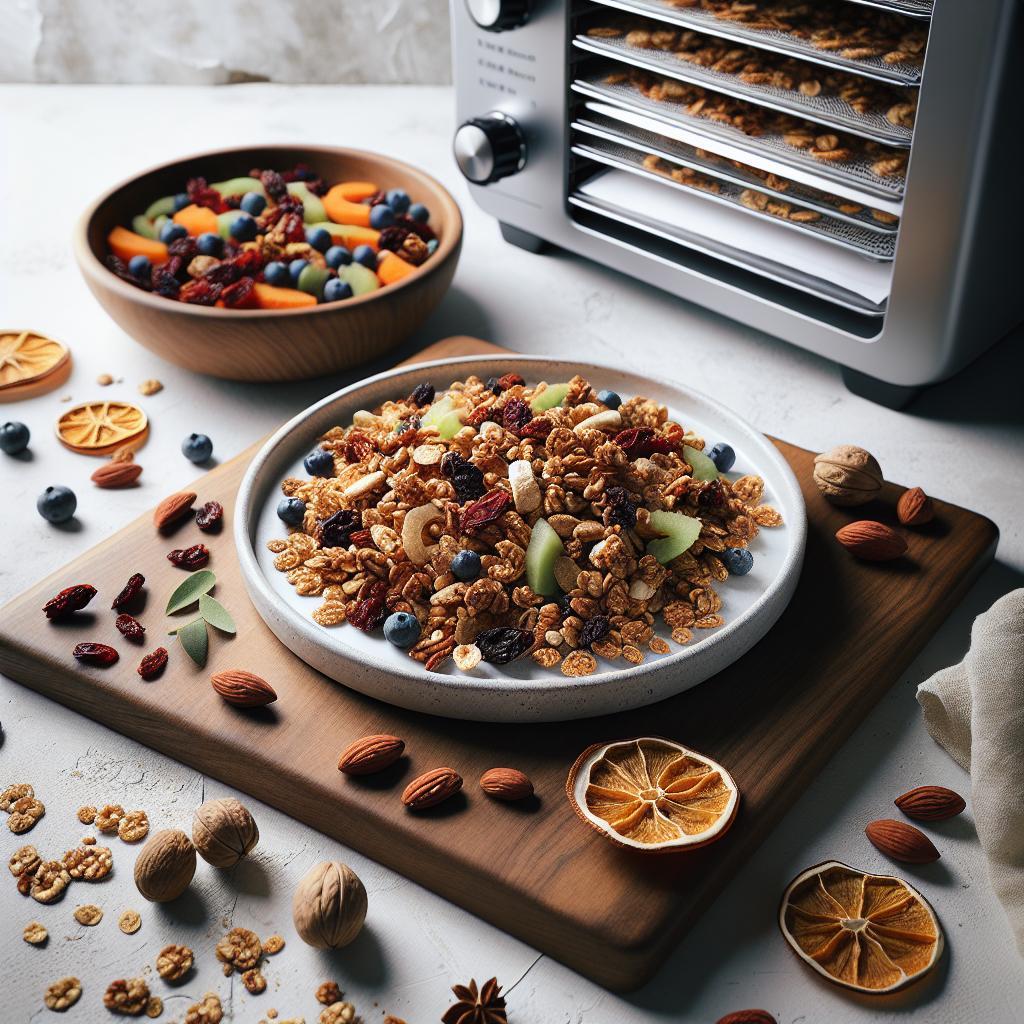
By using this site, you agree to the Privacy Policy and Terms of Use.
Accept

CookHarvest

  • Home
  • About Us
  • Homemade Staples
    • Bread & Butter
    • DIY Dairy
    • Sauces & Condiments
    • Spice Mixes
  • Canning & Pickling
    • Jams & Jellies
    • Pickled Veggies
    • Chutneys & Relish
    • Tomato Sauces
  • Drying & Curing
    • Dehydrated Snacks
    • Homemade Jerky
    • Smoked Meats
    • Dried Herbs
  • Wild Foods
    • Wild Greens
    • Wild Mushrooms
    • Wild Berries
    • Nuts & Acorns
  • More
    • Tasty Ideas
    • American Home Meals
      • Comfort Eats
      • One-Pot Meals
      • Quick & Easy
      • Southern Classics
    • International Recipes
      • Asian Recipes
      • Italian Flavors
      • Mediterranean Flavors
      • Mexican Eats

CookHarvest

  • Home
  • About Us
  • Homemade Staples
  • Canning & Pickling
  • Drying & Curing
  • Wild Foods
  • More
Search
  • Home
  • About Us
  • Homemade Staples
    • Bread & Butter
    • DIY Dairy
    • Sauces & Condiments
    • Spice Mixes
  • Canning & Pickling
    • Jams & Jellies
    • Pickled Veggies
    • Chutneys & Relish
    • Tomato Sauces
  • Drying & Curing
    • Dehydrated Snacks
    • Homemade Jerky
    • Smoked Meats
    • Dried Herbs
  • Wild Foods
    • Wild Greens
    • Wild Mushrooms
    • Wild Berries
    • Nuts & Acorns
  • More
    • Tasty Ideas
    • American Home Meals
    • International Recipes
Follow US
  • Advertising Policy
  • Contact Us
  • Cookie Policy
  • Copyright Notice
  • Disclaimer
  • Privacy Policy
  • Terms of Service
By Fimaw.com
Crunchy Creations: Homemade Granola Using a Dehydrator
CookHarvest > Blog > Canning & Pickling > Tomato Sauces > Crunchy Creations: Homemade Granola Using a Dehydrator
Tomato Sauces

Crunchy Creations: Homemade Granola Using a Dehydrator

Dennis Powell By Dennis Powell Published January 12, 2026
Share
SHARE

There’s something undeniably satisfying about that first crunchy bite of homemade granola-a symphony of toasted oats, nuts, and a hint of sweetness that dances on your palate. While traditional baking methods have long held the spotlight, a quieter kitchen hero is winning hearts: the dehydrator. In “Crunchy Creations: Homemade Granola Using a Dehydrator,” we’ll explore how this ingenious appliance transforms simple ingredients into golden, crunchy clusters bursting with flavor, texture, and wholesome goodness. Whether you’re a seasoned granola guru or a curious food adventurer, get ready to unlock a new level of crisp perfection that’s as easy to make as it is delightful to eat.

Contents
Crunchy Creations: Homemade Granola Using a DehydratorPrep and Cook TimeYieldDifficulty LevelIngredientsInstructionsChef’s NotesServing SuggestionsQ&AFuture Outlook

Crunchy Creations: Homemade Granola Using a Dehydrator

Crunchy creations like homemade granola using a dehydrator transform breakfast into an art form, marrying wholesome nutrition with irresistible texture. Rooted in traditional recipes yet adaptable to modern taste buds, crafting granola at home allows you to control every ingredient and infuse bursts of flavor that store-bought versions simply lack. Many recall the comforting aroma of toasted oats and nuts wafting through the kitchen-this recipe captures that essence, perfected by the gentle, consistent drying power of a dehydrator to create the ultimate crunchy snack.

Prep and Cook Time

Preparation: 15 minutes

Dehydrating: 6-8 hours (depending on humidity and thickness of spread)

Yield

Approximately 6 cups of homemade granola

Difficulty Level

Easy to Medium – Ideal for beginner cooks but rewarding for seasoned food enthusiasts seeking precise texture control

Ingredients

  • 3 cups rolled oats, old-fashioned for texture
  • 1 cup raw almonds, roughly chopped
  • 1/2 cup raw walnuts, chopped
  • 1/2 cup unsweetened shredded coconut
  • 1/3 cup sunflower seeds
  • 1/4 cup chia seeds
  • 1/4 cup honey or pure maple syrup (for vegan option)
  • 1/4 cup coconut oil, melted
  • 1 teaspoon pure vanilla extract
  • 1 teaspoon ground cinnamon
  • 1/2 teaspoon fine sea salt
  • 1/2 cup dried cranberries or raisins (added post-dehydrating)
  • Optional: 1/4 cup hemp seeds or flaxseeds for extra nutrition

Instructions

  1. Mix Dry Ingredients: In a large mixing bowl, combine rolled oats, almonds, walnuts, shredded coconut, sunflower seeds, chia seeds, cinnamon, and sea salt. Toss thoroughly to evenly distribute.
  2. Prepare Wet Mixture: In a separate small bowl, whisk together honey (or maple syrup), melted coconut oil, and vanilla extract until smooth and well blended.
  3. Combine: Pour the wet mixture over the dry ingredients. Use a sturdy spatula to fold everything gently, ensuring every flake and nut is lightly coated. This will help clump and caramelize during dehydrating.
  4. Spread Evenly: Lay a sheet of parchment paper on your dehydrator trays. Spread the granola mixture in a thin, even layer (about 1/4 to 1/2 inch thick) to promote uniform drying and crispness. Avoid overcrowding or thick piles.
  5. Dehydrate: Set your dehydrator to 115°F (46°C). Dry for 6 to 8 hours, checking periodically after 6 hours for desired crunch. Use a spatula to gently flip the granola at 3- to 4-hour intervals to ensure even drying and prevent soggy patches.
  6. Cool and Add Mix-Ins: Once crisp and golden, remove from the dehydrator and let cool completely on the trays. Then toss in dried cranberries or raisins, and any additional seeds like hemp or flax if desired.
  7. Store Properly: Transfer cooled granola to an airtight container or mason jar. Store in a cool, dry place to maintain crunchiness and freshness for up to 3 weeks.

Chef’s Notes

  • Ingredient Swaps: Substitute almonds with pecans or hazelnuts for a different flavor profile. Use pumpkin seeds instead of sunflower seeds to boost iron.
  • Sweeteners: Adjust the honey or maple syrup quantity if you prefer a less sweet or more decadent granola.
  • Spices: Add a pinch of nutmeg or cardamom for warm, aromatic nuances that elevate your crunchy creations.
  • Even Drying: Rotating trays every few hours is key for uniform crispness without burning edges. Avoid dehydrating at temperatures above 115°F as it can cook rather than dry the granola.
  • Make-Ahead: This granola freezes beautifully in airtight bags for up to 3 months. Simply thaw at room temperature before serving.

Serving Suggestions

Enjoy your crunchy creations sprinkled over creamy Greek yogurt or your favorite dairy-free alternative. Drizzle with fresh honey and garnish with sliced fresh fruit such as bananas or berries for a vibrant morning boost. Alternatively, serve as a snack alongside a warm cup of chai tea or coffee – the perfect balance of nutty sweetness and crisp texture to brighten any occasion. For a decadent twist, mix into vanilla ice cream or smooth with almond butter for homemade granola bars.

Nutrient Per Serving (1/2 cup)
Calories 230 kcal
Protein 6 g
Carbohydrates 28 g
Fat 11 g

For more on crafting wholesome, flexible breakfast recipes, visit our Healthy Breakfast Ideas page. Also, learn about the benefits of slow drying and temperature management at the National Dehydrator Association.

Crunchy Creations: Homemade Granola Using a Dehydrator

Q&A

Q&A: Crunchy Creations – Homemade Granola Using a Dehydrator

Q1: Why use a dehydrator to make granola instead of baking it in the oven?
A: The dehydrator is a game-changer for homemade granola! It gently removes moisture at low temperatures, preserving nutrients and ensuring every bite is satisfyingly crunchy without the risk of burning. Plus, you get to enjoy that toasted flavor with less fuss and more control.

Q2: What ingredients make the best base for homemade granola in a dehydrator?
A: Classic granola bases like rolled oats, sliced almonds, pumpkin seeds, and coconut flakes work beautifully. Add a touch of natural sweetener like honey or maple syrup and a splash of coconut oil to bind everything while the dehydrator does its magic.

Q3: How long does it typically take to dehydrate granola?
A: Patience is a virtue here! Dehydrating homemade granola can take anywhere from 6 to 12 hours depending on the moisture content and your dehydrator’s settings. The result? Crunchy, golden clusters that are worth every minute.

Q4: Can I customize the flavors and add-ins?
A: Absolutely! The dehydrator is your creative playground. Mix in dried fruits, chia seeds, cinnamon, vanilla extract, or even a pinch of sea salt. Add dried berries or cacao nibs after dehydrating to keep their texture intact.

Q5: What’s the secret to achieving perfectly crunchy granola using a dehydrator?
A: The secret lies in evenly layering the ingredients on your dehydrator trays and stirring them gently halfway through the process. This encourages even drying and that coveted crunch without over-drying to brittleness.

Q6: How should homemade dehydrated granola be stored?
A: Store your crunchy creations in an airtight container at room temperature. Properly dehydrated granola can stay fresh and crunchy for several weeks-making it the perfect grab-and-go snack or breakfast topper.

Q7: Is dehydrator granola healthier than store-bought options?
A: Often, yes! Homemade granola gives you full control over ingredients and sweetness levels-no hidden preservatives or excess sugars. Dehydrating at low temperatures also helps retain more nutrients compared to high-heat baking.

Q8: Can gluten-free oats be used in dehydrator granola?
A: Definitely! Gluten-free rolled oats work just as well and are perfect for keeping your granola safe for those with gluten sensitivities. Just ensure all your add-ins are gluten-free too, for a truly wholesome snack.

Q9: What’s a fun way to enjoy homemade dehydrated granola besides traditional cereal?
A: Sprinkle it atop yogurt parfaits, mix it into smoothie bowls, or even use it as a crunchy crust for desserts. Your dehydrated granola can add texture and flavor to everything from salads to ice cream!

Q10: Any tips for first-time dehydrator granola makers?
A: Start simple! Use a tried-and-true recipe, monitor your granola closely during the last couple of hours, and don’t be afraid to experiment with flavors once you nail the technique. Remember, the crunchier the better!

Future Outlook

As the final crunch echoes and the last golden clusters are savored, the magic of homemade granola using a dehydrator truly shines. This method not only preserves the integrity of your ingredients but elevates each bite into a symphony of textures and flavors that store-bought just can’t match. Whether sprinkled atop yogurt, blended into smoothies, or enjoyed straight from the jar, your crunchy creations will redefine snacking with natural goodness and artisanal flair. So dust off that dehydrator, gather your favorite nuts, seeds, and spices, and embark on a granola journey that’s as wholesome as it is delicious-because the best bites are the ones crafted by your own hands.
Crunchy Creations: Homemade Granola Using a Dehydrator

You Might Also Like

Hearty Beef and Bean Stew: A Savory Comfort Classic

Unlocking the Secrets of the Italian Bean: A Culinary Gem

Mediterranean Salad Magic: Fresh, Flavorful, and Wholesome

Hearty Beef Stew Secrets: A Savory Comfort Classic Unveiled

Discover the Flavors of the Authentic Mexican Bake Delight

TAGGED:andcrunchygranolahomemadethe
Share This Article
Facebook Twitter Pinterest Whatsapp Whatsapp LinkedIn Telegram Threads
What do you think?
Love0
Sad0
Happy0
Sleepy0
Angry0
Dead0
Wink0
Previous Article Preserving Fresh Flavor: The Art of Putting Up Tomatoes Preserving Fresh Flavor: The Art of Putting Up Tomatoes
Next Article Mastering Mushroom Tolerance: Step-by-Step Testing Guide Mastering Mushroom Tolerance: Step-by-Step Testing Guide
Wholesome Warmth: Crafting the Perfect Simple Chicken Soup
Quick & Easy
Hearty One Pot Sausage & Bean Soup: Flavor in Every Spoon
One-Pot Meals
Crispy Delight: The Ultimate Fried Green Tomato Sandwich Guide
Southern Classics
Savor Garlic Butter Green Beans: A Flavorful Veggie Delight
Comfort Eats

Most Viewed Posts

  • Soothing DIY Bath Salts with Dried Herbs & Blooms Guide (568)
  • Whip Up Magic: Homemade Butter for Perfect Baking Results (566)
  • Whip Up Creamy Buttermilk Ranch Dressing at Home Today (554)
  • Mastering Injera: The Art of Ethiopia’s Signature Bread (502)
  • Mastering the Art: How to Smoke Perfect Summer Sausage (466)

Tags

and art beef berry bread butter chicken crafting creamy crispy crunchy decadent diy easy flavorful fluffy for foraging guide hearty homemade how jam make master mastering mushroom nuts perfect savor savory sweet tangy the top turkey ultimate unlock unlocking why wild with yogurt your zesty

You Might Also Like

Creamy Roasted Garlic Mashed Potatoes: A Savory Twist
Tasty Ideas

Creamy Roasted Garlic Mashed Potatoes: A Savory Twist

Dennis Powell Dennis Powell January 14, 2026
Brine vs. Dry Rub: Unlocking Flavor Secrets for Perfect Meat
Smoked Meats

Brine vs. Dry Rub: Unlocking Flavor Secrets for Perfect Meat

Dennis Powell Dennis Powell January 12, 2026
Crisp & Sweet: The Ultimate Guide to Dehydrated Apple Chips
Tomato Sauces

Crisp & Sweet: The Ultimate Guide to Dehydrated Apple Chips

Dennis Powell Dennis Powell January 12, 2026
Crafting Homemade Chicken Jerky: A Step-by-Step Guide
Homemade Jerky

Crafting Homemade Chicken Jerky: A Step-by-Step Guide

Dennis Powell Dennis Powell January 12, 2026
Wild Nuts Wonders: Elevate Your Cheese Board Flavorfully
Nuts & Acorns

Wild Nuts Wonders: Elevate Your Cheese Board Flavorfully

Dennis Powell Dennis Powell January 12, 2026
Savor the Flavor: Cheese & Herb Bread Pudding Recipe
Tasty Ideas

Savor the Flavor: Cheese & Herb Bread Pudding Recipe

Dennis Powell Dennis Powell January 12, 2026
Follow US
By Fimaw.com © All Rights Reserved.
  • Advertising Policy
  • Contact Us
  • Cookie Policy
  • Copyright Notice
  • Disclaimer
  • Privacy Policy
  • Terms of Service
Welcome Back!

Sign in to your account

Lost your password?