
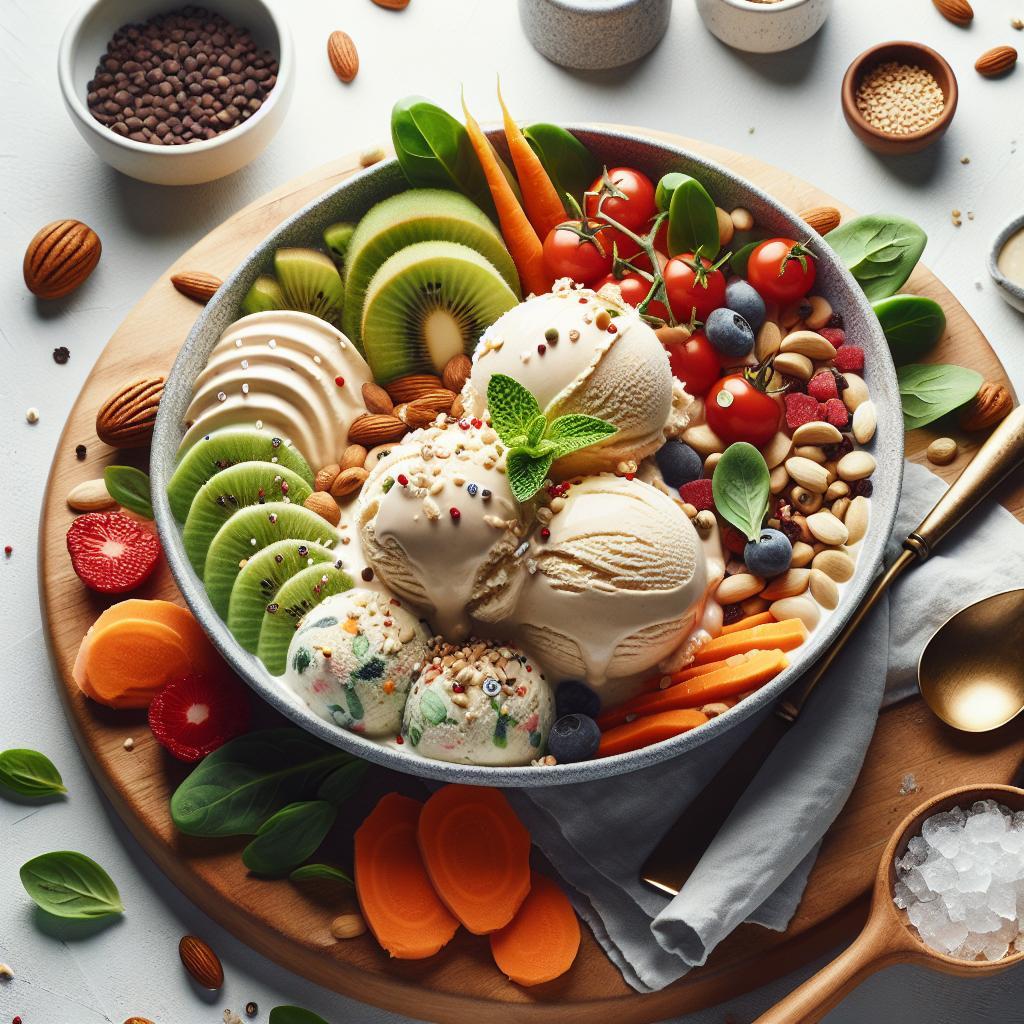
Creamy Delight: How to Make Easy Homemade Vegan Ice Cream
There is a special lift that comes with the first spoonful of properly made ice cream: cold, silky, and full of flavor. This vegan version uses plant-based fats and simple techniques to deliver that same mouthfeel without dairy.
- Quick payoff: A smooth, scoopable vegan base with minimal equipment.
- Flexible: Swap milks, sweeteners, and mix-ins to match dietary needs.
- Low fuss: Churned or no-churn approaches yield excellent texture.
Why this recipe works
This recipe balances fat, sugar, and stabilizer to limit ice crystals and encourage creaminess. Full-fat coconut milk supplies fat while a small cornstarch slurry increases viscosity and stability.
These principles mirror techniques used in traditional custard-style ice creams but adapted to plant-based ingredients. That keeps texture pleasant and extends scoopability straight from the freezer.
Prep and Cook Time
Preparation Time: 15 minutes of active work. The heating step takes only a few minutes to meld ingredients and activate the thickener.
Freezing Time: Approximately 6 hours, though overnight yields the firmest results. Plan ahead for chilling and final setting.
Yield and Difficulty
Yield: About 6 generous scoops, depending on serving size and mix-ins. Use a standard pint-sized freezer container for storage.
Difficulty: Easy — this recipe suits beginners and confident cooks alike. Follow the sequence and chilling steps to secure consistent texture.
Ingredients
Gather pantry-stable items and one or two fresh options for mix-ins. The base uses coconut and almond milks for a creamy, neutral canvas.
Remove any cans from the fridge before you start to let the fats relax a little; warm-but-not-hot temperatures on the stovetop help incorporate the cornstarch without curdling.
Key ingredients explained
Full-fat coconut milk: This provides the primary fat and mouthfeel. See the general properties of coconut milk for background on fat content and culinary uses.
Cornstarch: A simple starch that thickens without a heavy egg custard. Learn how cornstarch behaves when heated and why it stabilizes frozen desserts.
- 2 cups canned full-fat coconut milk (shake before opening)
- 1 cup unsweetened almond milk or other plant milk
- 1/2 cup natural maple syrup
- 1 tbsp vanilla bean paste or extract
- 1 tbsp cornstarch
- Pinch of sea salt
- Optional: 1/2 cup dark chocolate chips, toasted coconut, or chopped nuts
Instructions
Work in measured stages: combine, thicken, chill, churn, and finally firm in the freezer. Each step controls ice formation and texture.
Use an accurate timer and a thermometer if available; aim to warm the base without boiling and to chill it fully before churning.
- Combine the base: Whisk coconut milk, almond milk, and maple syrup in a medium saucepan over medium heat until warm and blended.
- Make the slurry: Dissolve cornstarch in 2 tablespoons cold almond milk to avoid lumps; whisk until smooth.
- Thicken: Slowly whisk the slurry into the warm mixture. Stir constantly for 4–6 minutes until the mixture thickens slightly and coats the back of a spoon. Remove from heat.
- Flavor: Stir in vanilla and salt. The small salt amount lifts the perceived sweetness and flavor complexity.
- Chill: Transfer to a clean bowl, press plastic wrap onto the surface to prevent skin, and refrigerate at least 4 hours or overnight.
- Churn or no-churn: Churn in an ice cream maker per manufacturer guidelines until soft-serve. For no-churn, freeze in a shallow container, stirring every 30 minutes for 2–3 hours to break ice crystals.
- Add mix-ins: Fold in chips or nuts in the last minutes of churning or after a few stirs during no-churn freezing.
- Final freeze: Transfer to a freezer-safe container, press parchment onto the surface, and freeze 2–3 hours to firm.
No-churn tips
If you lack an ice cream maker, frequent stirring and shallow freezing mimic churning by disrupting crystal growth. Blend semi-frozen chunks briefly to homogenize for a silkier feel.
For small batches, use a loaf pan and fold the partially frozen mix with a sturdy spatula; this keeps aeration and reduces ice formation.
Tips for Success: Crafting the Creamy Texture at Home
Temperature control, fat content, and a bit of stabilizer create scoopable vegan ice cream. The timing of chilling and churning matters more than exotic ingredients.
Use high-fat plant milks and allow the base to cool completely before churning. Warm bases trap air poorly and encourage ice crystals.
- Use full-fat coconut milk for richness and mouth-coating texture.
- Thorough chilling prevents the churned base from melting quickly during processing.
- Try different sweeteners like maple for depth or date syrup for caramel notes.
Adjust the mix-in timing to balance texture: add crunchy items late in churning to keep them intact and evenly distributed.
Serving Suggestions
Present this vegan ice cream in a variety of ways to highlight texture contrasts. Crisp elements like toasted coconut or waffle cone bring a satisfying crunch.
For an indulgent pairing, serve a scoop with a warm fruit compote or a small vegan brownie to juxtapose hot and cold sensations.
Garnish ideas: toasted coconut, cacao nibs, fresh berries, or a pinch of flaky salt. These finishes enhance flavor and make the dessert visually appealing.
Consider portion control by using a standard scooper; a chilled scoop releases more cleanly and looks professional on the plate.
Storage and Shelf Life
Store ice cream in an airtight container with parchment pressed to the surface to reduce ice crystals. Keep the container in the coldest part of the freezer, not the door.
Homemade vegan ice cream keeps well for up to two weeks when sealed properly. Over time, flavor and texture may decline as the fats oxidize and crystals grow.
Nutrition Snapshot
The recipe delivers a balance of calories from fat and carbohydrates with modest protein. Use the nutrients table as a guide, adjusting for your chosen mix-ins.
To lower calories, reduce sweetener or substitute lighter plant milks, but expect some change in texture and scoopability.
| Nutrient | Per Serving |
|---|---|
| Calories | ~210 kcal |
| Protein | ~2 g |
| Carbohydrates | ~18 g |
| Fat | ~14 g |
Related Recipes and Resources
Explore additional plant-based treats and technique guides on our site. These internal pages expand on bases, stabilizers, and creative pairings to refine your craft.
See our vegan dessert recipes collection for complementary sweets and plant-based basics for ingredient deep dives and substitution charts.
For context on frozen-dessert history and classification, review the general overview of ice cream and its variations. For flavoring ingredients, consult the maple syrup page and the vanilla entry.
FAQ
Do I need an ice cream maker?
No, you do not need an ice cream maker. Churned machines speed the process and trap air for a lighter texture, but frequent stirring while freezing produces a smooth result.
For best no-churn results, use a shallow container and break up ice crystals by stirring every 20–30 minutes until semi-firm, then finish with a quick blend if desired.
How can I make this nut-free?
Use oat or rice milk instead of almond milk and keep mix-ins nut-free. Oat milk often yields a neutral, slightly sweet base that supports creaminess when paired with coconut milk.
Check labels for cross-contamination if you or a guest has an allergy. Adjust sweetness slightly, as oat milk can taste sweeter than unsweetened almond milk.
Can I reduce sugar and keep creaminess?
Yes, reduce sweetener modestly and compensate with a small amount of glycerin or invert sugar to help scoopability, or increase the fat proportion with more coconut milk. Note that texture changes as sugar content drops.
Alternatively, use low-glycemic sweeteners like erythritol blends designed for freezing; test small batches to dial in flavor and mouthfeel.
What causes icy texture and how do I avoid it?
Icy texture results from insufficient fat, inadequate churning, or freezing too slowly. Use a fat-rich base, chill thoroughly before churning, and finalize freeze at a consistent low temperature.
Adding a small stabilizer (cornstarch, tapioca, or a tiny amount of glucose syrup) reduces crystal growth. Soaked and blended cashews can also improve creaminess.
How long will homemade vegan ice cream last?
Properly sealed and stored in the coldest part of the freezer, expect good quality for up to two weeks. Over longer storage, flavor and texture will decline as fats oxidize and crystals enlarge.
To reduce freezer burn, press parchment onto the surface before sealing and minimize temperature fluctuations by avoiding the freezer door compartment.
Happy churning — with a little practice you will craft stable, scoopable vegan ice cream that pleases both plant-based and traditional dessert lovers.
See also: vegan ice cream


