
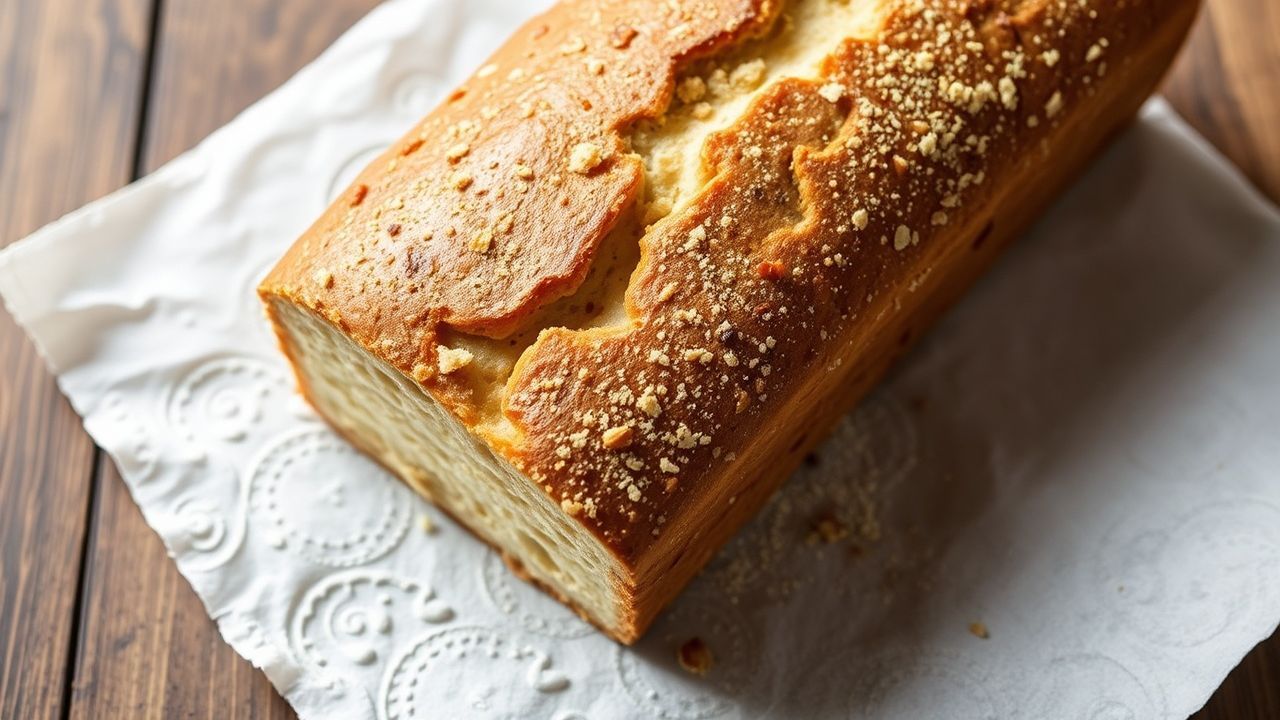
Imagine sinking your teeth into a warm, freshly baked loaf that’s grain-free, flavorful, and reliably moist. This guide breaks the technique into clear steps so you can bake consistent Paleo bread at home.
- Key takeaways: Proven ingredient ratios and handling practices produce a tender crumb and crisp crust.
- Tools matter: Simple gear and accurate measuring stabilize results across batches.
- Hydration and binders: Eggs, oil, and small starch additions control texture.
- Storage: Cool fully before wrapping; freeze slices for long-term quality.
Why Paleo Bread behaves differently
Paleo bread uses non-grain flours and relies on eggs and other binders rather than gluten to hold structure. Without gluten, the crumb and rise require different techniques than wheat breads.
Understanding the role of each ingredient helps you predict outcomes and troubleshoot. For background on the dietary approach that favors these ingredients, see Paleo diet.
Ingredients
Choose fresh almond and coconut flours; freshness affects flavor and texture. Almond flour supplies fat and body, while coconut flour soaks moisture and adds structure.
Use a small amount of a starch like arrowroot or tapioca to lighten the crumb and a reliable chemical leavener. For context on how leavening agents create lift, consult leavening agent.
- 1 ¾ cups almond flour, finely ground
- ¼ cup arrowroot powder
- ¼ cup coconut flour
- 1 tsp baking soda
- ½ tsp sea salt
- 4 large eggs, at room temperature
- 2 tbsp raw honey or pure maple syrup
- 3 tbsp melted coconut oil
- 1 tbsp apple cider vinegar
- 1 tsp xanthan gum (optional, for improved elasticity)
Tools and prep
Use a 9×5-inch loaf pan, an accurate scale or dry measuring cups, and a silicone spatula for folding. A thermometer helps verify oven temperature stability for consistent baking.
Preheat the oven to 350°F (175°C) and prepare the pan by greasing or lining with parchment. Good preparation prevents sticking and supports a clean release.
Instructions
Straightforward sequencing produces reliable results: dry mix, wet mix, combine, then bake. Each step influences texture, so handle the batter deliberately and avoid overworking any component.
Follow the order below and monitor visual cues like batter thickness and crust color instead of clock-watching alone. Baking is partly chemistry and partly visual judgment.
Mixing and Hydration
Combine dry ingredients in one bowl: almond flour, arrowroot, coconut flour, baking soda, salt, and optional xanthan gum. Whisk until homogeneous and break up any lumps for even hydration.
Whisk eggs, honey, melted coconut oil, and apple cider vinegar in a separate bowl until slightly frothy; this traps air to help rise. Slowly fold the wet mixture into the dry, using a silicone spatula to scrape the bowl clean and achieve a thick but pourable batter.
Baking and Cooling
Transfer batter to the prepared loaf pan and smooth the top with a spatula. Bake 35–40 minutes until golden and a toothpick inserted in the center comes out clean or with a few moist crumbs.
Cool the loaf in the pan for 15 minutes, then transfer to a wire rack to cool completely before slicing. Proper cooling lets trapped steam redistribute and prevents a gummy interior.
Practical tweaks and swaps
Adjust small variables rather than overhauling the recipe when you need a different result. For example, increase arrowroot by a tablespoon for a lighter crumb or add one more egg for extra lift and moisture.
Substitute avocado oil for coconut oil to reduce coconut flavor, or omit sweetener for a savory loaf. When swapping flours, maintain total dry weight to avoid wildly different hydration needs.
After the tip, try a test loaf at 80% of the oven time to learn your oven’s hot spots and bake profile. Small experimental runs save larger batches from repeat errors.
Tips for success
Use fresh almond flour; rancid oils change flavor and shorten shelf life. If your flour sits near heat sources it oxidizes faster, so store it chilled or in a cool pantry.
Keep baking soda fresh; stale leavening reduces lift and dense crumb follows. Test baking soda by mixing a small amount with vinegar—an active fizz indicates potency.
- Measure by weight: Prefer grams for dry ingredients to reduce batch-to-batch variability.
- Room-temperature eggs: They emulsify better and support consistent mixing.
- Do not overbake: Remove when a clean toothpick or a few moist crumbs appear.
- Slice cold: Fully cooled bread produces neat slices and stable texture.
Serving suggestions
Serve slightly warm to highlight the tender crumb and crisp edges. This loaf pairs well with savory toppings like smashed avocado or roasted turkey, or with a neutral nut butter for simplicity.
Garnish slices with fresh herbs for aroma and brightness; rosemary or thyme complement the nutty base. Toast frozen slices straight from the freezer for quick breakfasts or sandwiches.
Nutrition and portioning
This recipe yields about eight generous slices with macro balance favoring fat and protein over carbohydrates. Typical paleo loaves deliver higher calories per slice than wheat bread due to nut flour density.
Use the table below to plan portions; adjust serving size based on dietary goals and accompaniments. For context on macronutrients and dietary planning consult Nutrition.
| Nutrient | Per Slice |
|---|---|
| Calories | 200 kcal |
| Protein | 7g |
| Carbohydrates | 9g |
| Fat | 16g |
Common troubleshooting
Dense, wet loaves usually indicate underbaking, excess moisture, or too much fine coconut flour. Verify oven temperature and compare batter thickness to the guideline; the batter should be thick but still move slightly when the pan is tapped.
Crumbly results often point to insufficient binders or omitted xanthan gum. If you avoid gums, increase egg count by one and add one teaspoon more starch to improve cohesion.
When discussing grains and gluten, recognize these terms influence consumer expectations. For background on gluten and its functional role in traditional bread, see Gluten.
FAQ
What makes Paleo bread different from regular bread?
Paleo bread excludes grains and gluten and relies on nutrient-dense flours and eggs for structure. That change demands different ratios and baking techniques to control texture.
Why does Paleo bread sometimes turn out dense?
Density often comes from poor hydration balance, inactive leavening, or underbaking. Ensure leaveners are fresh and follow the mixing cues rather than relying solely on bake time.
Can I replace almond flour with another flour?
You can substitute flours like tigernut or cassava, but each alters hydration and flavor. When you swap, match total dry weight and add small trial adjustments to the liquid.
How should I store Paleo bread for best texture?
Store fully cooled slices in an airtight container at room temperature up to three days or freeze for up to one month. Toast frozen slices directly to refresh texture and flavor.
Any quick fixes for sticky crumb?
Slice and briefly rebake at 300°F (150°C) for 5–8 minutes to dry excess moisture, or allow longer cooling on a rack before slicing. These steps let internal steam escape and firm the crumb.
For deeper reading on ingredients commonly used in Paleo baking, explore the Wikipedia entries on almond and coconut.
Follow these steps, measure carefully, and tweak incrementally. With a few controlled trials you will consistently produce a tender, flavorful Paleo loaf that slices clean and keeps well.
See also: Paleo bread


