
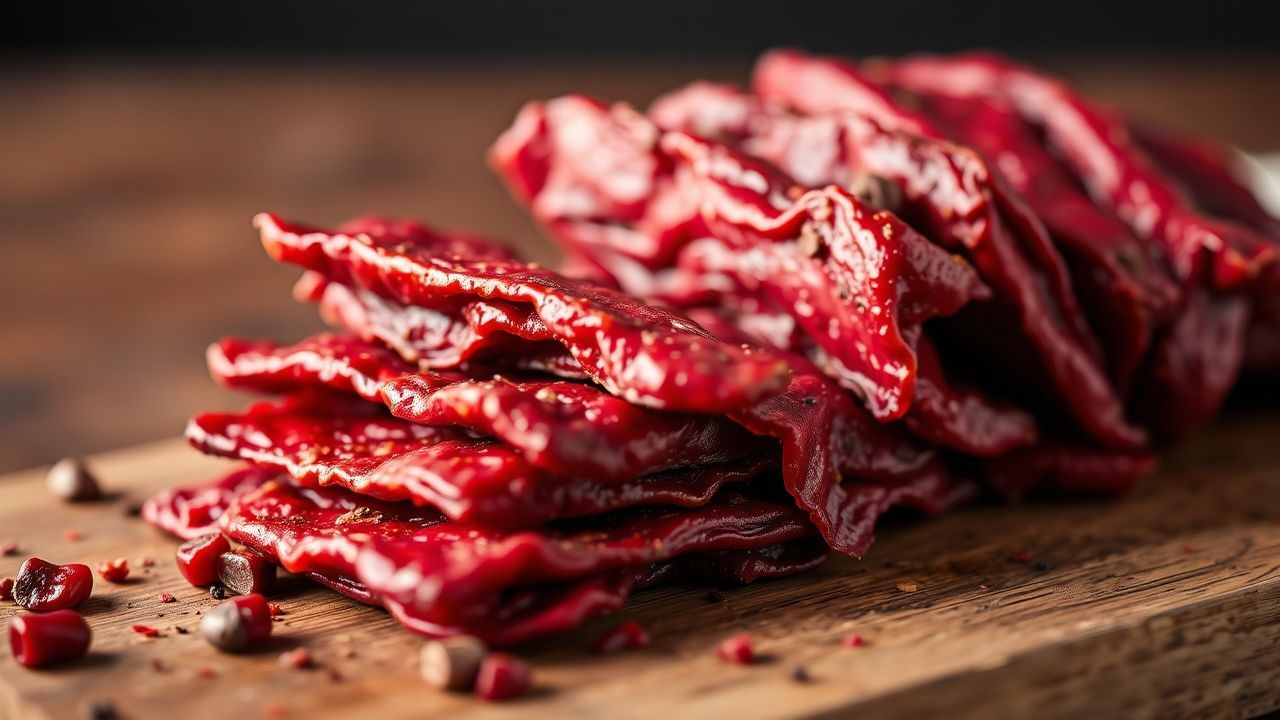
Crafting Ground Beef Jerky: No Gun Needed, Just Flavor!
Making ground beef jerky at home delivers bold, consistent flavor without specialized tools. You rely on control of seasoning, thickness, and temperature rather than a jerky gun, and you get reliable chew and shelf life when you follow temperature and drying best practices.
- Quick summary: use lean ground beef, 6–8 hour marinade, dry at 160°F (71°C).
- Tools: baking sheet or dehydrator, parchment or silicone, sharp knife.
- Safety: reach 160°F internal equivalent for ground meat to reduce pathogens.
- Yield: roughly 6 servings from 500g ground beef.
Why Ground Beef Jerky Works
Ground beef jerky offers a uniform texture and consistent flavor distribution because spice and cure mix into the meat matrix. Unlike sliced jerky, the seasoning penetrates evenly, producing reproducible results batch to batch.
Additionally, ground meat allows you to control moisture by setting layer thickness and drying time. This control reduces uneven spots and speeds drying, while maintaining chew when you target optimal water activity.
For background on preserved meat and related techniques, review jerky history and methods and the broader subject of curing and preservation for context.
Prep and Cook Time
Plan for hands-on time plus passive marination and drying. Typical active prep takes 15–30 minutes, but marination and dehydration add most of the total time.
Expect a timeline like the following: marinate 6–8 hours or overnight, then dry 4–6 hours at a controlled temperature. Total time ranges from 10 to 14 hours depending on layer thickness and equipment efficiency.
- Preparation: 15 minutes
- Marinating: 6–8 hours (preferably overnight)
- Drying: 4–6 hours (depending on thickness and method)
- Total: Approximately 10–14 hours
Yield and Difficulty
From 500 g of lean ground beef you get about 6 servings of roughly 60 g each after dehydration. Exact yield varies with moisture loss and final thickness.
Skill level sits at medium: you need patience and basic food-safety awareness, but no advanced knife work or equipment. Follow time and temperature closely for consistent results.
Ingredients
Use lean ground beef and adjust seasoning to taste. Keep salt and acid levels consistent, because they affect preservation and flavor intensity.
Core ingredients for a 500 g batch include:
- 500 g lean ground beef (about 90% lean)
- 2 tbsp low-sodium soy sauce
- 1 tbsp Worcestershire sauce
- 1 tbsp honey or maple syrup
- 1 tsp smoked paprika
- 1 tsp garlic powder
- 1 tsp onion powder
- ½ tsp cracked black pepper
- ½ tsp red pepper flakes (optional)
- 1 tsp kosher salt
Instructions
Follow the sequence: choose lean meat, prepare a balanced marinade, mix gently, form a uniform layer, then dry to the right moisture level. Each step affects texture, flavor distribution, and shelf life.
Below are step-by-step actions with practical cues you can reproduce in any home kitchen.
Choosing the Cut and Lean Percentage
Select ground beef with about 90% lean content to balance moisture and grease. Higher fat content increases spoilage risk and leads to a greasy bite after drying.
If you prefer, grind a trimmed lean cut like top round at home for tighter control. For reference on the raw material, see beef composition and cuts.
Prepare the Marinade
Mix soy sauce, Worcestershire, sweetener, and spices until uniform. Emulsify the honey or syrup into the liquid base so the seasoning spreads evenly through the meat.
Combine the marinade with the ground beef and fold with a spatula to avoid overworking proteins. Refrigerate for 6–8 hours or overnight to let flavors meld and salt begin to act on the meat.
Forming the Jerky Layer
Line a tray with parchment or a silicone mat and spread the marinated meat into a thin, uniform layer—aim for about 1/8 inch (3 mm) thickness. Consistent thickness ensures even dehydration and prevents under-dried pockets.
Smooth the surface with an offset spatula and keep edges tidy. If you prefer strips, chill briefly and slice into pieces before drying for quicker, even airflow around each piece.
Drying Technique and Temperatures
Dry at a maintained air temperature of 160°F (71°C) to reduce bacterial risk in ground meat and to reach a safe endpoint. Use a dehydrator set to the recommended temperature or an oven set low with the door slightly ajar for airflow.
Monitor progress every 1–2 hours. The correct final product is pliable and dry to the touch, not brittle and not tacky. For method background, consult food drying practices.
Cooling, Cutting, and Storage
Allow jerky to cool on a wire rack to prevent condensation before packing. Warm, sealed containers trap moisture and reduce shelf life.
Store in airtight containers or vacuum bags. Refrigerate for extended storage or freeze for long-term keeping. Label with date and use within recommended windows based on storage method.
Tips for Success
Small technique changes create big differences in texture and safety. Pay attention to layer thickness, marinade time, and drying temperature to get repeatable results.
Also, test one small strip to check texture before finishing the whole batch—this saves time and reduces waste.
After trying a baseline recipe, vary sweeteners, smoke powders, or acid levels in small batches. Tasting iteratively helps dial in your signature profile without risking a full batch.
Serving Suggestions
Ground beef jerky pairs well with high-acid accents and contrasting textures. Serve with pickles, sharp cheese, or crisp salads to balance richness.
Make small diced pieces to add savory depth to grain bowls, sandwiches, or mashed potatoes. Jerky also makes a compact, protein-rich travel snack when vacuum-packed.
Rotate seasoning profiles slowly. Strong flavors like intense smoked paprika or extra sugar will change drying behavior and perceived doneness, so adjust time and test accordingly.
Nutrition and Serving Size
Typical nutrition per 60 g serving: about 150 kcal, 18 g protein, 7 g fat, 3 g carbs. These values vary with fat percentage and added sweeteners.
Label your homemade batches roughly and adjust portions for high-protein needs or caloric goals. Track sodium if you use soy or curing salts frequently.
| Nutrient | Per Serving (60 g) |
|---|---|
| Calories | 150 kcal |
| Protein | 18 g |
| Carbohydrates | 3 g |
| Fat | 7 g |
Food Safety and Best Practices
Ground beef requires specific attention because grinding distributes surface bacteria throughout the product. For safety, apply heat or drying regimes that achieve pathogen reduction consistent with guidance for ground meats.
Consult reliable sources on safe handling and temperatures. For an overview of food-safety concepts and guidance, see food safety.
FAQ
Do I need a dehydrator to make ground beef jerky?
No. You can use a conventional oven with the door propped open slightly for airflow, or a dehydrator designed for jerky. Both methods work when you control temperature and airflow.
However, a dehydrator simplifies consistent air circulation and may reduce total drying time for large batches.
What temperature should I use for ground beef jerky?
Dry at around 160°F (71°C) to achieve an equivalent pathogen-reducing environment for ground meat. Maintain steady heat and monitor texture rather than relying only on time.
If you need reference on preservation and heat treatment, see the material on curing and heat preservation.
How long will homemade jerky last?
At room temperature in an airtight container, a properly dried batch lasts a few weeks; refrigeration extends life to months, and freezing preserves it longer. Humidity and packaging quality affect shelf life strongly.
Vacuum sealing reduces oxygen exposure and slows rancidity. Always check for off-odors or visible mold before consuming.
Can I use fattier ground beef?
Fattier meat makes juicier but less shelf-stable jerky; excess fat oxidizes and shortens shelf life, and it can feel greasy. For best balance, use 90% lean or trim higher-fat meat before grinding.
If you must use higher fat, consume stored jerky sooner and keep it refrigerated or frozen to limit spoilage.
How do I know when jerky is done?
Done jerky bends and cracks slightly but does not snap. It should feel dry to the touch and show no wet or glossy spots in the interior of thicker pieces.
When unsure, dry longer in short increments and test; under-dried ground jerky poses a food-safety risk, so err on the side of additional drying time.
Final Notes
Ground beef jerky delivers consistent seasoning and chew while using common kitchen tools. By controlling lean percentage, layer thickness, marinade balance, and drying temperature, you get safe, tasty results each time.
Use iterative testing and small adjustments to refine flavor. With methodical practice and attention to food-safety cues, you can produce professional-caliber jerky at home without specialized equipment.
For deeper reading on drying and preservation, consult the linked Wikipedia resources embedded above.
See also: Beef jerky
