

There is a special satisfaction in turning fresh chiles into bright, tangy jars of pickled peppers that lift every meal. This guide shows practical techniques, safe steps, and flavor-building tactics so you get crisp texture and balanced heat every time.
- Quick wins: simple brine ratios and jar prep that work reliably.
- Flavor control: ways to layer aromatics and manage heat.
- Safety first: sterilization and refrigeration practices for long-lasting jars.
- Serving ideas: multiple uses to boost kitchen versatility.
Prep and Cook Time
Preparation: about 20 minutes. Most hands-on time goes to washing, slicing, and heating the brine.
Pickling time: refrigerate for at least 48 hours; flavor deepens between 5 and 7 days. Texture and taste evolve, so plan ahead for best results.
Yield
This recipe yields roughly 4 cups of pickled chili peppers, which makes a good supply for weekly use or small gatherings. Expect roughly eight condiment servings depending on portion size.
Jars will fit in a standard refrigerator door and keep your pickles accessible for sauces, sandwiches, and quick garnishes. Adjust batch sizes by scaling the brine ratio proportionally.
Difficulty Level
Skill level: Easy to Medium. The technique uses basic kitchen tools and common pantry ingredients. Follow sterilization and brine steps closely to ensure safety and consistent texture.
Time and attention to detail pay off: careful slicing, correct acid ratio, and proper cooling all affect the final crunch and shelf life. These are repeatable skills that become faster with practice.
Ingredients
Choose fresh, firm chiles that have no soft spots or blemishes. Mixing varieties such as jalapeño, serrano, or habanero gives layered heat and attractive color.
Below are the tested ingredient amounts for a standard small batch. Scale up by maintaining the vinegar-to-water ratio and salt level for consistent preservation.
- 1 lb fresh chili peppers (e.g., jalapeño, serrano, habanero)
- 2 cups distilled white vinegar (5% acidity)
- 1 cup water
- 2 tbsp kosher salt
- 2 tbsp granulated sugar
- 4 cloves garlic, smashed
- 1 tsp black peppercorns
- 1 tsp mustard seeds
- 1 small cinnamon stick
- Optional aromatics: fresh oregano, bay leaves, or sliced onions
Instructions
Follow these sequential steps. Keep sentences short and work methodically to avoid mistakes that affect safety or texture.
Use jars with good sealing lids and check them for cracks or chips before use. A clean workspace reduces contamination risk.
Step 1 — Prepare the peppers
Rinse peppers under cold running water and pat dry with a clean towel. Slice into rings or halves; remove seeds and membranes to reduce heat if desired.
Wear gloves when handling super-hot varieties to prevent skin or eye irritation. Label very hot jars so you avoid accidental overuse on mild dishes.
Step 2 — Sterilize jars and lids
Submerge jars and lids in boiling water for 10 minutes, then lift with tongs and let them air-dry on a clean towel. Sterilization reduces microbial load and keeps brine clear.
Always inspect lids for compromised seals or rust. Use dedicated canning tools where possible to avoid cross-contamination between batches.
Step 3 — Make the brine
Combine vinegar, water, salt, and sugar in a saucepan over medium heat. Add garlic, peppercorns, mustard seeds, and the cinnamon stick, and bring to a simmer to dissolve solids.
Do not boil vigorously; a gentle simmer extracts aromatics without breaking down the vinegar balance. Allow the brine to stay hot when pouring over packed jars for best infusion.
Step 4 — Pack and pour
Pack peppers and optional aromatics tightly into sterilized jars, leaving about ½ inch headspace. Tightly packed jars minimize floating and help even brine coverage.
Pour the hot brine to fully submerge the peppers, leaving headspace to allow for minor expansion. Remove air bubbles by tapping jars or running a clean utensil along the inside edge.
Step 5 — Seal, cool, and chill
Close jars firmly and let them cool to room temperature on a towel-lined surface. Once cool, place jars in the refrigerator and wait at least 48 hours before sampling.
For longer shelf life, consume within three months when refrigerated. If you prefer shelf-stable canning, follow pressure/canning guidelines from an authoritative source.
Chef’s Notes: Tips for Success
Small technique shifts produce big results. For crisp peppers, use vinegar with 5% acidity and avoid overcooking the brine, which can soften cell walls.
Layer spices rather than relying on one dominator. Whole seeds provide slow flavor release; fresh herbs add bright top notes that balance heat.
Experiment with sugar and salt balance to tune sweetness and texture. Too much sugar will mute capsaicin perception; the right amount will round acidity and highlight aroma.
For historical and culinary context, read about preservation methods on the pickling page. For pepper varieties and their heat ranges, consult the Capsicum entry.
Serving Suggestions
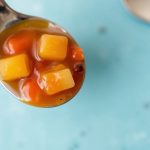
Use pickled chiles as a finishing condiment on tacos, sandwiches, grilled meats, or salads. Their acidity cuts through rich dishes and brightens savory profiles.
Try drizzling a little pickle juice onto steamed rice or roasted vegetables for an instant lift. Mix chopped pickles into mayo-based spreads for tangy sauces and dips.
Nutritional Info
Pickled chiles add minimal calories while delivering vitamin C, capsaicin, and flavor punch. The brine contributes sodium, so use portions accordingly.
Below is a concise nutritional snapshot per 2-tablespoon serving to help with portion planning in recipes and meal prep.
| Nutritional Info (per 2 tbsp) | Calories | Protein | Carbs | Fat |
|---|---|---|---|---|
| Pickled Chili Peppers | 12 | 0.5g | 3g | 0g |
Safety & Preservation Notes
Acidity and refrigeration preserve quick pickles. Use vinegar labeled 5% acidity for reliable acidity levels that inhibit spoilage organisms.
For batches intended for shelf storage, consult validated canning procedures. The home-canning process requires tested time and temperature controls to ensure safety.
For reference on acid and preservation science, see the vinegar article on acidity and preservation methods. For microbial transformations related to preserved foods, review the fermentation overview.
FAQ
Can I pickle any variety of chili pepper?
Yes, you can pickle nearly any pepper as long as it is fresh and firm. Mild varieties like jalapeño offer balanced heat, while habanero provides intense spice.
Mix varieties for layered flavor and visual contrast. Keep notes on heat levels and segment jars by variety if you plan to gift or label for later use.
How long before pickled peppers are ready to eat?
Refrigerated quick-pickles taste good after 48 hours, with optimal flavor at 5 to 7 days. Texture may firm up or relax slightly during that time.
Always taste incrementally and record preferred timing for repeat batches. Jars will keep for several months when refrigerated properly.
Do pickled peppers stay spicy?
Pickling changes the perceived heat, often softening the sharp edge while preserving capsaicin. Seeds and membranes hold most heat, so remove them to reduce spice.
Marinating time, pepper type, and sugar in the brine all influence heat perception. Adjust variables to reach your target profile.
Are pickled peppers healthier than fresh peppers?
Both fresh and pickled peppers provide vitamins and antioxidants. Pickled peppers add sodium from brine, so moderate portions if you watch salt intake.
If you ferment peppers rather than quick-pickle with vinegar, you may gain probiotic benefits. Choose the method that best suits your nutrition goals and flavor preferences.
How do I control the crunch?
To preserve crispness, use fresh firm chiles, minimal heat during brine preparation, and consider tannin sources like grape leaves. Keep jars cold after sealing to maintain texture.
Rapid cooling after sealing and avoiding long, strong boiling will reduce cell wall breakdown. Test a small jar to refine your approach for large batches.
In Retrospect
Pickling chili peppers is a practical skill that rewards patience and small adjustments. With clear steps and reliable ratios, you can craft jars that stay bright, crunchy, and flavorful.
Use this guide as a foundation: adapt spices, adjust heat, and record results. Your pantry will thank you, and your guests will enjoy the bold, preserved heat you create.
See also: pickled peppers


