
The flaky crust of a pot pie defines texture and comfort, folding crisp layers around a rich filling for a classic result. Mastering the flaky crust begins with cold butter, brief handling, and predictable chilling so the pastry lifts and flakes reliably.
- Key takeaway: Cold butter and minimal handling create the laminated pockets that bake into flakes.
- Chill first: Resting the dough firms butter and relaxes gluten for cleaner layers.
- Right butter: Higher-fat European-style butter boosts flavor and flake definition.
- Bake smart: Heat control and an egg wash refine color and crispness.
Overview: What a Flaky Crust Does
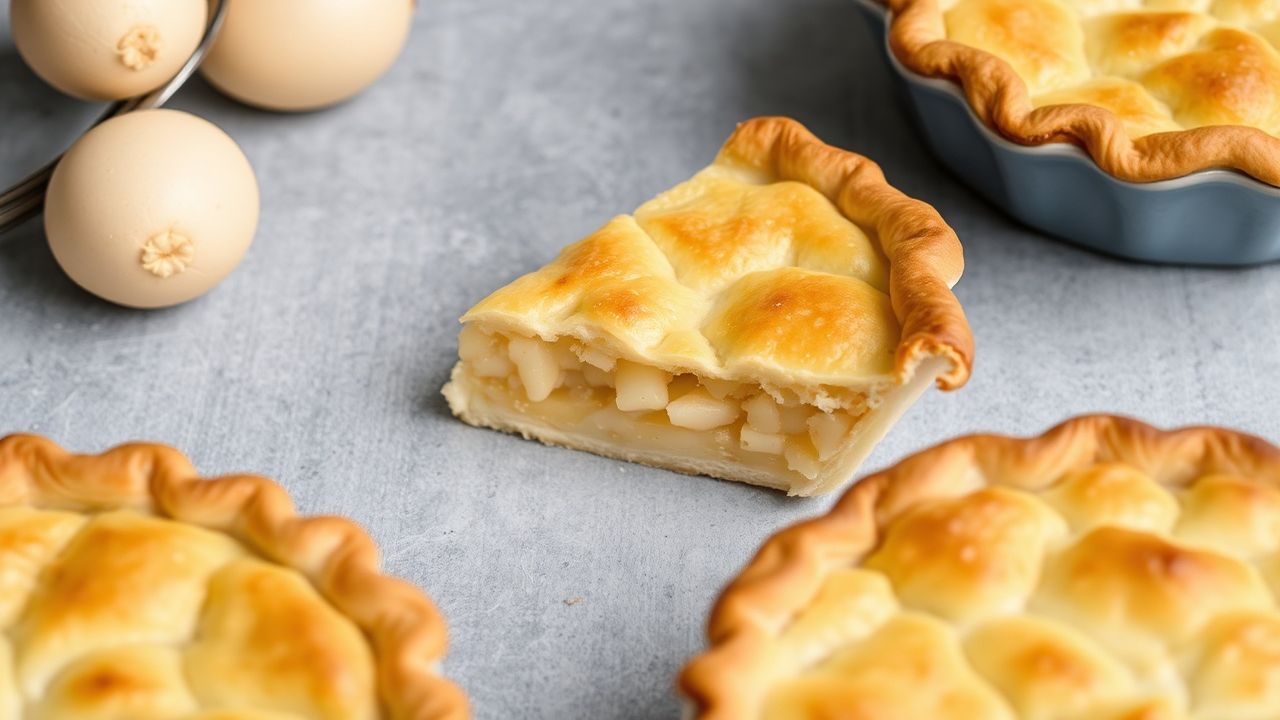
A flaky crust provides structure, crispness, and a buttery counterpoint to a moist filling. It must hold a dense filling without turning soggy while breaking into layered shards when cut.
The mechanics of a flaky crust depend on trapped steam separating thin dough layers. Those steam pockets lift the pastry and form the flakes that indicate correct technique.
Flaky Crust: Prep and Cook Time
Plan mixing, chilling, and baking so the crust stays cold until oven time. Chilling prevents butter from smearing and encourages the distinct layers that make a crust flaky.
Typical timings are short active work and longer chill windows; allow at least one hour of chilling for stable handling. Extended overnight chills improve flavor and rollability, and yield more predictable flaking.
- Preparation: 30 minutes active
- Chilling: 1 hour minimum; overnight recommended
- Cooking: 35–40 minutes at 400°F (205°C), adjust as needed
- Total: About 2 hours including chilling
Flaky Crust: Yield
This top-crust recipe covers a standard 9-inch pot pie or two small galettes, serving about six. Divide dough for individual portions and reduce bake time by 5–10 minutes for single-serve dishes.
Adapt quantities by scaling flour and butter proportionally if you need more pastry. Keep technique consistent; overworking when scaling is a common source of dense, non-flaky results.
Flaky Crust: Difficulty Level
Expect a medium technical demand: the method is straightforward but precise temperature control and minimal handling matter. Temperature and butter size separate flaky success from a dense, short crust.
Practice tightens results; observe how butter pieces and chill time affect lift and texture over successive bakes. Small adjustments to water and acid tune tenderness without compromising flake structure.
Flaky Crust: Ingredients
Ingredient ratios drive structure and mouthfeel. Use measured cups or a scale and pick the highest-fat butter you can for richer flavor and better flake definition.
Keep liquids cold and add them sparingly; the dough should just cohere when pressed. An acid like vinegar or lemon juice slightly weakens gluten for a more tender crumb without altering flavor.
- 2 1/2 cups all-purpose flour, sifted
- 1 tsp fine sea salt
- 1 cup (2 sticks) unsalted butter, cold and diced — European-style preferred
- 1/2 cup ice-cold water, adjusted as needed
- 1 tbsp apple cider vinegar or lemon juice (optional)
Flaky Crust: Instructions
Follow the sequence: dry mix, cut in butter, add liquid, form discs, chill, roll, assemble, and bake. Each step intentionally directs where the flake structure is set.
Work quickly, keep ingredients cold, and pause to chill if the dough warms or becomes tacky. Time your oven so a cold crust meets a preheated cavity for maximum lift.
Mixing the Dough
Combine sifted flour and salt in a chilled bowl to slow butter softening. A cold work surface and tools buy time and help keep butter pieces visible in the dough.
Cut the cold diced butter into the flour until the mixture resembles coarse peas. Those pea-size butter bits melt to create steam pockets and distinct flakes in the finished flaky crust.
- Combine flour and salt. Whisk to distribute the salt evenly.
- Cut in the butter. Use a pastry cutter, two knives, or cold fingertips; work quickly to avoid warming the butter.
- Check texture. Keep some pea-size pieces; they yield better lift and layered structure.
Adding Liquid and Forming Discs
Add ice water and acid in small increments and stop when the dough barely holds together. Overhydration yields a cohesive mass with too much gluten, which reduces flakiness.
Shape into two flat discs, wrap tightly, and chill. Chilling firms butter, relaxes gluten, and improves the flaky crust’s rollability and final texture.
- Add cold water sparingly. Drizzle while stirring lightly; avoid soaking the flour.
- Form discs. Press gently—no kneading.
- Chill. Refrigerate at least 1 hour; overnight strengthens handling and flavor.
Rolling, Assembling, and Baking
Roll from the center outward on a floured board, turning the dough to keep thickness even. Work quickly and chill between passes if dough warms.
Top a prepared filling with the crust, crimp edges, vent the top, and brush with egg wash for color and sheen. Bake at 400°F (205°C) 35–40 minutes or until golden and flaky.
- Roll to fit. Leave a small overhang for sealing.
- Assemble. Add filling, place crust, crimp, and cut vents.
- Bake. Bake until the crust is golden and the filling bubbles.
Chef’s Notes: Tips for Success with a Flaky Crust
Small details determine final texture; manage temperature, butter size, and handling to land between flaky and fragile. Adjustments help in warm kitchens and varying humidity.
Use cold tools, keep butter in visible pieces, and rest the dough long enough to let hydration and flavor develop. These simple controls repeat success across ovens and climates.
- Butter choice: Higher-fat butter increases flavor and flake definition.
- Butter size: Larger pieces give more lift; too small yields a short, crumbly crust.
- Acid trick: One tablespoon of vinegar or lemon softens gluten for a tender crumb.
- Egg wash: Brushing the top promotes even browning and shine.
Allow at least one full paragraph between callouts to preserve layout flow and avoid visual crowding on the page. Small spacing choices help readers skim and return to key points.
Flaky Crust: Storage, Make-Ahead, and Safety
Dough freezes well for up to one month if wrapped tightly; thaw overnight in the refrigerator before rolling. Maintaining chill during thaw prevents butter softening and preserves flake potential.
Store baked pot pie covered in the fridge up to three days and reheat in a 350°F oven to restore crispness. Avoid the microwave for best texture; quick oven reheats revive the flaky crust without sogginess.
Serving Suggestions for a Flaky Crust
Fresh herbs brighten a rich filling and compliment a flaky crust. Use thyme or rosemary with chicken and mushroom fillings for classic aroma and balance.
Pair the pie with a bright green salad or roasted root vegetables to cut richness and add contrast. For presentation, individual pot pies showcase the flaky crust and make plating easier.
- Garnish with fresh thyme or rosemary for aroma.
- Offer a bright side salad to balance richness.
- Try individual pot pies for elegant portions.
See also: Pie filling basics and How to egg wash for related technique and pairing ideas.
Nutritional Snapshot
Estimated nutrition depends on filling and portion size; a butter-rich crust increases calories and fat compared with shortening-based doughs. Adjust filling composition and portion size to manage per-serving calories.
Use lean proteins and vegetables to lower calories while keeping the flaky crust intact. A smaller slice paired with a hearty salad reduces per-person energy density without losing the sensory appeal.
| Nutrient | Amount per Serving |
|---|---|
| Calories | 420 kcal |
| Protein | 8 g |
| Carbohydrates | 32 g |
| Fat | 27 g |
Technical Notes and Science Behind a Flaky Crust
Butter melts during baking and creates steam that separates layers and forms flakes. That physical expansion is the primary mechanism behind lift and visible lamination.
Gluten development provides structure but excess makes the crust tough; a small hit of acid and cold handling limit gluten strength for tender layer formation. For background reading on the ingredients, consult resources on butter, pastry, and gluten.
For broader technique context, review materials about baking fundamentals. These references help connect practical steps to predictable physical outcomes.
FAQ
How do I keep the crust from getting soggy?
Par-bake the bottom crust for 6–8 minutes before adding a very wet filling. Also reduce filling liquid or thicken the sauce so the flaky crust meets less moisture during baking.
Can I use frozen butter or shortening instead of butter?
Frozen butter slabs work well if you refresh chill the dough before rolling to preserve the flaky layers. Shortening or lard increases tenderness but changes flavor and reduces classic butter taste.
What oven temperature is best for even browning?
Start at 400°F (205°C) to encourage lift, then reduce to 375°F (190°C) if the top browns too quickly. Use an egg wash for even color and shield edges with foil if they brown ahead of the center.
How long can I freeze the dough or the finished pie?
Wrap dough discs tightly and freeze up to one month; thaw overnight in the refrigerator before rolling. For a baked pie, freeze cooled portions and reheat in a 350°F oven from frozen for crisp restoration.
What adjustments help in humid climates?
Reduce added water slightly and increase chilling time; humidity accelerates flour hydration and can require less liquid. Keep bowls and tools chilled and return the dough to the fridge briefly between steps if needed.
See also: Flaky crust


