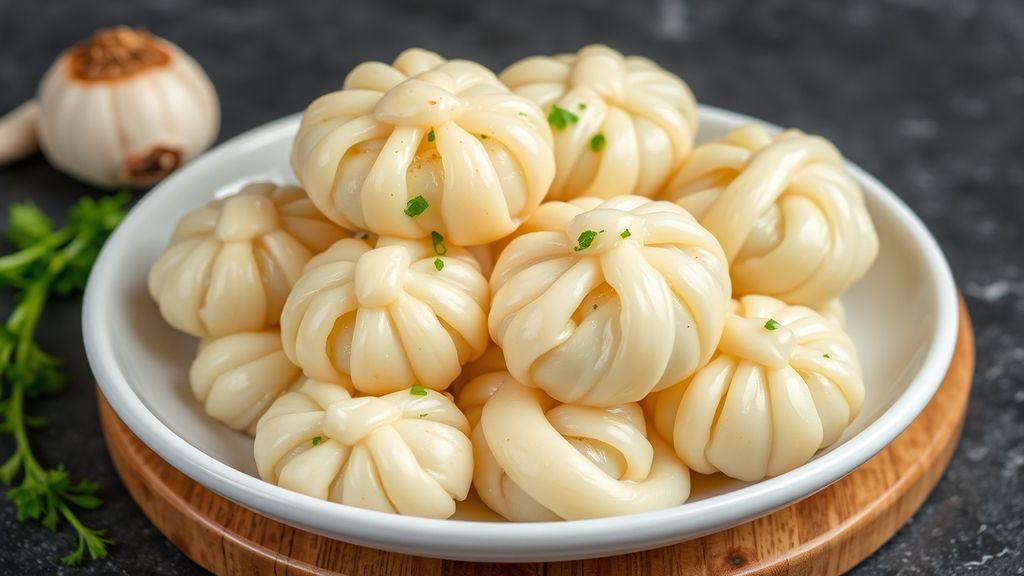
By using this site, you agree to the Privacy Policy and Terms of Use.
Accept

CookHarvest

  • Home
  • About Us
  • Homemade Staples
    • Bread & Butter
    • DIY Dairy
    • Sauces & Condiments
    • Spice Mixes
  • Canning & Pickling
    • Jams & Jellies
    • Pickled Veggies
    • Chutneys & Relish
    • Tomato Sauces
  • Drying & Curing
    • Dehydrated Snacks
    • Homemade Jerky
    • Smoked Meats
    • Dried Herbs
  • Wild Foods
    • Wild Greens
    • Wild Mushrooms
    • Wild Berries
    • Nuts & Acorns
  • More
    • Tasty Ideas
    • American Home Meals
      • Comfort Eats
      • One-Pot Meals
      • Quick & Easy
      • Southern Classics
    • International Recipes
      • Asian Recipes
      • Italian Flavors
      • Mediterranean Flavors
      • Mexican Eats

CookHarvest

  • Home
  • About Us
  • Homemade Staples
  • Canning & Pickling
  • Drying & Curing
  • Wild Foods
  • More
Search
  • Home
  • About Us
  • Homemade Staples
    • Bread & Butter
    • DIY Dairy
    • Sauces & Condiments
    • Spice Mixes
  • Canning & Pickling
    • Jams & Jellies
    • Pickled Veggies
    • Chutneys & Relish
    • Tomato Sauces
  • Drying & Curing
    • Dehydrated Snacks
    • Homemade Jerky
    • Smoked Meats
    • Dried Herbs
  • Wild Foods
    • Wild Greens
    • Wild Mushrooms
    • Wild Berries
    • Nuts & Acorns
  • More
    • Tasty Ideas
    • American Home Meals
    • International Recipes
Follow US
  • Advertising Policy
  • Contact Us
  • Cookie Policy
  • Copyright Notice
  • Disclaimer
  • Privacy Policy
  • Terms of Service
By Fimaw.com
Garlic Knots - 5-Step Homemade Garlic Knots Recipe: Soft, Chewy, and Bursting with Flavor
CookHarvest > Blog > Homemade Staples > Bread & Butter > Garlic Knots: The Ultimate 5-Step Homemade Recipe for Soft, Chewy, Flavor-Packed Knots
Bread & Butter

Garlic Knots: The Ultimate 5-Step Homemade Recipe for Soft, Chewy, Flavor-Packed Knots

Dennis Powell By Dennis Powell Published February 13, 2026
Share
SHARE

Garlic Knots: The Ultimate 5-Step Homemade Recipe for Soft, Chewy, Flavor-Packed Knots

Garlic Knots deliver warm, buttery comfort—crisp on the outside, pillowy inside, and saturated with bright garlic-herb aroma. This five-step recipe emphasizes controllable variables—hydration, flour choice, dough temperature, proofing, and finish—so every batch performs like a pizzeria product at home. Measurements are given in both metric and imperial, with baker’s percentages and chef annotations to troubleshoot texture and flavor.

Contents
Garlic Knots: The Ultimate 5-Step Homemade Recipe for Soft, Chewy, Flavor-Packed KnotsIntroduction: Origin and Why Technique MattersIngredients for 12 Garlic Knots (Metric & Imperial) — with Baker’s PercentagesPreparation Method — Five Precise StepsNutritional Information per Serving (1 Garlic Knot)Expert Pro-Tips to Elevate Your Garlic KnotsConclusion: Building Consistency Through Measurement and PracticeFAQ — Frequently Asked Questions about Garlic Knots
  • Key takeaway: One clear 5-step workflow (mix, knead, rise, shape, finish) yields reliably soft, chewy garlic knots.
  • Timing guide: Yeast activation, first rise, shaping, proofing, and bake benchmarks provided to standardize results.
  • Flavor boost: A brief garlic-butter bloom and fresh herbs deliver big aroma without soggy dough.
  • Pro tools: Digital scale, bench scraper, instant-read thermometer, and optionally a baking stone for consistent outcomes.
📜 Table of Contents
  • Introduction: Origin and Why Technique Matters
  • Ingredients for 12 Garlic Knots (Metric & Imperial) — with Baker’s Percentages
  • Preparation Method — Five Precise Steps
  • Nutritional Information per Serving (1 Garlic Knot)
  • Expert Pro-Tips to Elevate Your Garlic Knots
  • Conclusion: Building Consistency Through Measurement and Practice
  • FAQ — Frequently Asked Questions about Garlic Knots

Introduction: Origin and Why Technique Matters

Garlic knots originated in Italian-American pizzerias and bakery backrooms where leftover pizza dough was transformed into small tied breads. Their design—maximizing surface area via knots—creates a satisfying contrast between a garlicky crust and a tender crumb. Reproducing that balance at home depends on predictable variables: flour protein, hydration percentage, yeast activity, dough temperature, and a finishing technique that delivers flavor without sogginess.

Understanding the science behind each step—gluten development for chew, controlled fermentation for flavor, and brief high-heat baking for oven spring—permits small adjustments that produce very different results. This recipe is deliberately built to be reproducible in a typical home kitchen (ambient 20–25°C / 68–77°F).

Ingredients for 12 Garlic Knots (Metric & Imperial) — with Baker’s Percentages

Scaling by weight produces reliable texture and consistent yeast performance. Base yield: 12 knots. Baker’s percentages use flour = 100% (375 g).

Dry ingredients

  • All-purpose flour: 375 g (3 cups) — 100% (option: substitute all or part with 00 or bread flour for more chew)
  • Instant yeast: 7 g (1 packet / 2 1/4 tsp) — 1.9%
  • Fine sea salt: 9 g (1 1/2 tsp) — 2.4%
  • Granulated sugar: 10 g (2 tsp) — 2.7% (feeds yeast, enhances browning)

Wet ingredients & finish

  • Warm water (38–43°C / 100–110°F): 240 g (1 cup) — 64% hydration
  • Olive oil (in dough): 30 g (2 tbsp) — 8%
  • Olive oil for surface: 15 g (1 tbsp) — optional
  • Unsalted butter (finish): 56 g (4 tbsp)
  • Fresh garlic: 18 g (about 4 cloves), minced or grated
  • Fresh parsley: 8 g (2 tbsp), finely chopped
  • Grated Parmesan (optional): 30 g (1/2 cup)
  • Coarse sea salt or flaky finishing salt: to taste

Preparation Method — Five Precise Steps

This approach uses a short, controlled fermentation to produce chew without a lengthy bulk proof. Times assume average kitchen conditions (20–25°C / 68–77°F); adjust where noted for warmer or cooler environments.

Step 1 — Activate and Mix

Whisk warm water, sugar, and yeast in a bowl; wait 2–3 minutes until the mixture shows a faint foam. Add the olive oil, then stir in flour and salt until the dough forms a shaggy mass.

Chef’s note: Using instant yeast straight into dry flour normally works, but pre-dissolving yeast with sugar provides a quick visual check on viability. If no activity appears after 5 minutes, a fresh packet or proof-test with warm water and a pinch of sugar will avoid under-risen dough.

Step 2 — Knead and First Rise

Knead on a lightly floured surface 6–8 minutes by hand or 4–5 minutes in a stand mixer with a dough hook until the dough becomes smooth and slightly tacky. Perform a windowpane test: stretch a small piece into a thin membrane without tearing.

Place dough in a lightly oiled bowl, cover, and let rise 45–60 minutes until nearly doubled. Target finished dough temperature: 24–26°C (75–79°F). Warmer kitchens shorten the rise; cooler kitchens lengthen it.

Chef’s note: The dough’s feel—soft and slightly springy—is a more reliable indicator than time alone. If the dough springs back quickly when poked, allow additional rising time; if it’s overly slack, reduce subsequent proof time to protect oven spring.

Step 3 — Divide and Shape

Turn the dough onto a work surface, divide into 12 equal pieces (approximately 48–52 g each). Roll each piece into a 12–15 cm (5–6 in) rope, tie into a simple knot, and tuck the ends underneath for a tidy profile.

Arrange knots on a parchment-lined tray with roughly 3 cm (1 in) spacing. Cover loosely with plastic or a damp towel and proof 20–30 minutes until slightly puffed but not fully doubled.

Chef’s note: Slight under-proofing at this stage preserves structure so knots maintain shape and spring in the oven. If ropes resist tying, allow the dough to relax 5–10 minutes to avoid tearing and tightening gluten.

Step 4 — Bake and Monitor

Preheat the oven to 230°C (450°F) with a baking stone or heavy tray inside. For oven steam: place a small metal pan on the oven floor while preheating; when inserting the knots, pour 120–180 ml (1/2–3/4 cup) boiling water into the pan to generate steam.

Bake 10–12 minutes until golden brown. For an internal check, target 93–96°C (200–205°F) with an instant-read thermometer for a fully set crumb. High heat encourages rapid oven spring and good color while keeping the interior moist.

Chef’s note: Brushing knots with a light film of olive oil before baking promotes a slightly crisper crust. Reserve the butter-based garlic topping for after baking to avoid soggy surfaces.

Step 5 — Finish with Garlic-Butter

Melt butter gently, add minced garlic and warm for 30–45 seconds to bloom the flavor—do not brown—then remove from heat and stir in chopped parsley. Brush the hot knots liberally, then sprinkle with grated Parmesan and flaky finishing salt if desired.

Serve immediately for the best textural contrast. For a deeper garlic character, use roasted garlic purée instead of raw minced garlic in the butter; roasted paste concentrates flavor with less moisture.

💡 Expert Insight
Expert Insight: Introducing a burst of steam at the start of baking delays crust set, improving oven spring and producing a slightly chewier exterior. A small shallow pan of boiling water poured into the oven floor works well in most home ovens.
⚠️ Pro-Caution
Pro-Caution: Avoid overworking the dough after the first rise. Excessive handling tightens gluten and yields dense, tough knots.

Nutritional Information per Serving (1 Garlic Knot)

Estimated values for one of 12 knots using all-purpose flour and full-fat butter. Values will vary with substitutions or different portion sizes.

Per serving (approximate):

  • Calories: 150 kcal
  • Carbohydrates: 18 g
  • Fat: 7 g
  • Saturated Fat: 3.5 g
  • Protein: 3 g
  • Sodium: 180 mg (variable based on finishing salt)
  • Fiber: 0.8 g

For precise dietary planning, weigh the finished batch and calculate using a nutrition database or app. Substituting olive oil for some or all of the finish butter reduces saturated fat and slightly alters mouthfeel and shine.

Expert Pro-Tips to Elevate Your Garlic Knots

Small technical adjustments make a major difference in texture and flavor—these are techniques used in professional kitchens and artisanal bakeries.

Tip 1 — Flour selection: Use 00 or high-protein bread flour for more chew and stronger gluten structure. For a softer crumb, incorporate 25–30% lower-protein flour or add 1 tbsp milk powder to enrich the dough.

Tip 2 — Hydration & handling: The recipe sits at ~64% hydration. Increasing water by 10–20 g opens the crumb and softens the crumb, but requires gentler shaping to avoid deflating the dough.

Tip 3 — Garlic technique: Very fine mincing or grating distributes garlic flavor evenly. Briefly warming garlic in butter blooms volatile aromatics without producing the bitterness that burned garlic creates.

Tip 4 — Make-ahead & freezing: To freeze, par-bake knots 5–6 minutes until set but not browned, cool on a tray, then freeze until solid. Reheat from frozen in a 180°C (350°F) oven for 10–12 minutes, then finish with hot garlic-butter to restore freshness.

Tip 5 — Pairings & service: Offer strained marinara, herbed ricotta, or a lemony aioli to cut richness. Keep knots warm on a low oven rack and brush with fresh herbs just before serving for visual brightness and aroma.

Conclusion: Building Consistency Through Measurement and Practice

Reproducible, restaurant-quality garlic knots are the result of controlled variables: flour choice, hydration ratio, yeast health, dough temperature, proofing decisions, and a restrained finishing technique. Track changes—flour type, water weight, proof times—and note outcomes. After a few bakes, small adjustments will become intuitive and reproducible.

FAQ — Frequently Asked Questions about Garlic Knots

Concise solutions to common troubleshooting points and planning questions.

Are Garlic Knots the same as garlic bread?

No. Garlic knots are individual, shaped pieces of yeast-leavened dough (often from pizza dough), while garlic bread usually uses sliced baguette or loaf brushed with garlic butter. The crumb structure and baking approach differ significantly.

How should I store and reheat Garlic Knots?

Store cooled knots in an airtight container at room temperature for up to 48 hours, or freeze up to 3 months. Reheat in a 180°C (350°F) oven: 6–10 minutes from thawed, 10–12 minutes from frozen. Brush with garlic-butter after reheating for refreshed flavor and shine.

Can I make Garlic Knots without yeast?

Yeast provides the characteristic chew and fermentation flavor. Quick-bread alternatives using chemical leaveners are possible, but texture and taste will differ markedly from true yeast-leavened garlic knots.

Why are my Garlic Knots dense?

Frequent causes: inactive yeast, under-kneading (insufficient gluten), short first rise, overly tight shaping, or overly cool dough temperature. Verify yeast viability, achieve a proper windowpane, and allow dough to relax before shaping.

How can I intensify garlic flavor without making knots soggy?

Bloom minced garlic briefly in warm butter and apply after baking. For concentrated flavor with less moisture, use roasted garlic purée. Finish with finely chopped fresh parsley for a bright counterpoint to the richness.

External resource: For background on garlic-flavored breads, see Garlic bread — Wikipedia.

Internal link suggestions: Link to site pages such as Best Pizza Dough, Easy Bread Recipes, and Homemade Dips using the anchor text Garlic Knots for topical relevance and improved internal SEO flow.


See also: Garlic Knots

You Might Also Like

The Ultimate Guide to Maple Butter: 5 Irresistible Recipes That Elevate Breakfast and Dinner

Fluffy Biscuits: 5 Secrets for Bakery-Soft, Buttery Perfection

7 Irresistible Recipes Using Smoked Salt Spread That Transform Everyday Meals

The Ultimate 5-Minute Cinnamon Spread Recipe — Smooth, Sweet, and Chef-Ready

Garlic butter: 7 Creative, Restaurant-Level Uses for Roasted Garlic Butter (Bread, Pasta, Steak & More)

TAGGED:5-step garlic knot recipebaker's percentage garlic knotsbakers percentages bread recipegarlic butter knotsgarlic knots recipehomemade garlic knotshow to make garlic knotspizza dough garlic knotspizzeria-style garlic knotssoft chewy garlic knotsstep-by-step garlic knots recipe
Share This Article
Facebook Twitter Pinterest Whatsapp Whatsapp LinkedIn Telegram Threads
What do you think?
Love0
Sad0
Happy0
Sleepy0
Angry0
Dead0
Wink0
Previous Article Cinnamon spread - Homemade Cinnamon Sugar Spread: Quick 5-Minute Recipe and Pro Tips The Ultimate 5-Minute Cinnamon Spread Recipe — Smooth, Sweet, and Chef-Ready
Next Article Smoked Salt - 7 Irresistible Recipes Using Smoked Sea Salt Spread 7 Irresistible Recipes Using Smoked Salt Spread That Transform Everyday Meals
Eggplant Parmesan - Crispy Baked Eggplant Parmesan: Classic Comfort, Lighter and Flavorful
Eggplant Parmesan: Crispy Baked Comfort Redefined — Classic Flavor, Lighter and Flavorful
Tasty Ideas
Honey Butter - Homemade Honey Butter Recipe: 5 Variations to Elevate Breakfast Toast
The Ultimate Honey Butter Guide: 5 Gourmet Variations to Elevate Breakfast Toast
Bread & Butter
Sourdough Bread - Master Classic Sourdough Bread: Step-by-Step Recipe for Tangy Crust and Chewy Crumb
Master Classic Sourdough Bread: Step-by-Step Recipe for Tangy Crust and Chewy Crumb
Bread & Butter
Cinnamon Spread - 3-Ingredient Cinnamon Sugar Spread: Creamy, Sweet, and Ready Fast
3-Ingredient Cinnamon Spread: Creamy, Sweet, and Ready Fast (The Toast-Obsessed Favorite)
Bread & Butter

Most Viewed Posts

  • Top Starter Cultures to Craft Creamy Homemade Yogurt (866)
  • Soothing DIY Bath Salts with Dried Herbs & Blooms Guide (693)
  • Whip Up Creamy Buttermilk Ranch Dressing at Home Today (669)
  • Melt Magic: Your Ultimate Guide to Homemade Cheese Fondue (655)
  • Mastering the Art: How to Smoke Perfect Summer Sausage (646)

Tags

and art beef berry bread butter chicken classic crafting creamy crispy crunchy easy exploring flavorful for fresh garlic golden guide hearty homemade how lemon mastering mexican perfect quick savor savoring savory southern sweet tangy the top turkey ultimate unlock unlocking why wild with your zesty

You Might Also Like

Buttermilk Biscuits - Fluffy Buttermilk Biscuits That Rise Every Time: Tips from Pros
Bread & Butter

The Ultimate Guide to Buttermilk Biscuits That Rise Every Time

Dennis Powell Dennis Powell February 13, 2026
Sourdough Bread - Classic Sourdough Bread: 7 Pro Tips for Better Oven Spring and Crust
Bread & Butter

Classic Sourdough Bread: 7 Pro Tips for Bigger Oven Spring, Crackly Crust, and Cleaner Scores

Dennis Powell Dennis Powell February 13, 2026
Maple Butter - 3-Ingredient Maple Sea Salt Butter (Better Than Store-Bought)
Bread & Butter

3-Ingredient Maple Butter With Sea Salt: The Silky, Better-Than-Store-Bought Spread

Dennis Powell Dennis Powell February 13, 2026
Churn Charm: A Step-by-Step Guide to Making Goat Butter
Bread & Butter

Churn Charm: A Step-by-Step Guide to Making Goat Butter

Dennis Powell Dennis Powell January 12, 2026
Whipping Up Butter: Easy Steps Using Your Stand Mixer
Bread & Butter

Whipping Up Butter: Easy Steps Using Your Stand Mixer

Dennis Powell Dennis Powell November 16, 2025
Crafting Homemade English Muffin Bread: Loaf-Form Delight
Bread & Butter

Crafting Homemade English Muffin Bread: Loaf-Form Delight

Dennis Powell Dennis Powell November 13, 2025
Follow US
By Fimaw.com © All Rights Reserved.
  • Advertising Policy
  • Contact Us
  • Cookie Policy
  • Copyright Notice
  • Disclaimer
  • Privacy Policy
  • Terms of Service
Welcome Back!

Sign in to your account

Lost your password?