
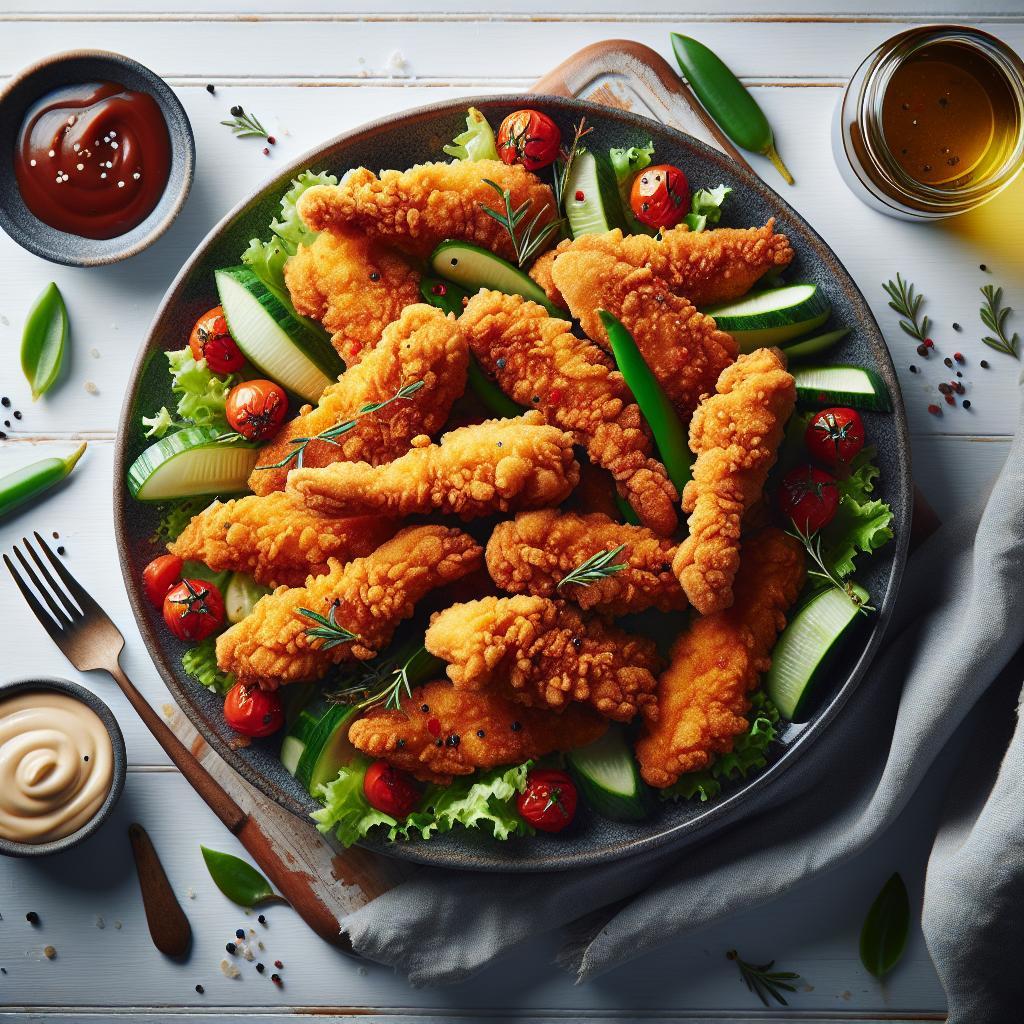
Perfectly crispy oven-fried chicken tenders deliver that golden crunch and juicy interior without the mess of deep frying. This version focuses on technique, ingredient choices, and oven tactics that replicate a fried texture while using minimal oil.
- High-heat bake and a light oil mist create a fried finish without deep frying.
- Panko + baking powder are the two textural hacks that maximize crunch.
- Proper spacing on a wire rack prevents steam and keeps the coating crisp.
Prep and Cook Time
Prep: 15 minutes | Cook: 18–20 minutes | Total: 35 minutes. These times assume tenders roughly 3–4 ounces each.
If you work in stages—dredge, chill, then bake—you gain more control over crisping and timing. Chilling briefly firms the coating and reduces sloughing during baking.
Yield and Difficulty
This recipe yields about 16 tenders, serving four adults. Expect a short active prep followed by unattended bake time.
Difficulty sits at easy-to-medium. You need basic kitchen tools: wire rack, rimmed sheet, thermometer, and a few bowls for dredging. Those tools give consistent, restaurant-quality results.
Ingredients
Ingredient choices determine final texture and flavor. Use fresh panko for crisp edges and a touch of baking powder to speed browning and create tiny air pockets.
Below is the compact ingredient list; substitute carefully if you change flour type or breadcrumbs.
- 1 ½ pounds chicken tenders, trimmed
- 1 cup all-purpose flour, sifted
- 1 teaspoon baking powder (baking powder)
- 1 tablespoon smoked paprika
- 1 teaspoon garlic powder
- 1 teaspoon onion powder
- ½ teaspoon cayenne pepper (optional)
- 1 teaspoon kosher salt
- ½ teaspoon freshly ground black pepper
- 2 large eggs
- ½ cup buttermilk (or plain yogurt thinned with water) (buttermilk)
- 2 cups panko breadcrumbs (panko), for extra crunch
- Cooking spray or light olive oil mist
- Fresh parsley for garnish (optional)
Instructions
Follow a methodical dredge sequence: dry mix, wet mix, and breadcrumb. That structure yields an even, adherent crust with minimal fallout during baking.
Use a rimmed sheet with a wire rack. The rack elevates the pieces so hot air circulates and the underside crisps as much as the top.
- Prepare the dry mix: Whisk together sifted flour, baking powder, smoked paprika, garlic powder, onion powder, cayenne, salt, and pepper until homogenous. A consistent dry mix ensures even seasoning and even browning.
- Mix the wet ingredients: Beat eggs with buttermilk until smooth. The acid and enzymes in buttermilk tenderize surface proteins, improving adhesion and mouthfeel.
- Coat the tenders: Dredge each tender in flour, shake off excess, dip in egg-buttermilk, then press into panko. Press lightly to build an even layer, but avoid compacting the panko too firmly; trapped air creates crunch.
- Arrange for airflow: Place tenders on a wire rack set over a rimmed sheet. Space pieces so they do not touch; crowding traps steam and softens the coating.
- Oven fry at high heat: Preheat to 425°F (220°C). Lightly mist the tops and edges of each tender with cooking spray or oil. Bake 18–20 minutes, flipping halfway, until golden and internal temperature reads 165°F (74°C).
- Rest briefly: Transfer to a clean rack to rest 3–4 minutes. Resting redistributes juices and preserves crispness for serving.
When you flip the tenders, do so gently with tongs to avoid removing coating. If you see loose crumbs, press them back into place before returning to the oven.
Tips for Success
Small adjustments produce big results. Control moisture, choose coatings with structure, and favor conduction and convection over steam.
These practical tips work in everyday kitchens and scale up for larger batches without losing texture.
- Use fresh panko: Panko provides larger flakes that brown in discrete pockets for an airy crunch.
- Control moisture: Pat tenders dry to improve adhesion. Excess water weakens the bond between layers.
- Double-dredge option: For an extra-thick crust, repeat the flour-egg-panko steps once more and chill briefly so the first layer firms.
- Oven placement: Middle rack gives balanced heat. If you need more color, finish briefly under a hot broiler while watching closely.
For technique background, compare oven frying to traditional methods like deep frying to understand where texture differences arise. Deep frying uses full oil immersion for instant surface gelatinization and Maillard reactions; oven methods aim to approximate those reactions using dry heat and targeted oil.
Technique Details
Temperature and airflow drive the final texture. Higher heat promotes Maillard browning, while the wire rack prevents steam accumulation that would soften the crust.
Adjust baking time modestly for thicker tenders or if baking from frozen. Add 3–6 minutes when starting from frozen, maintaining the same temperature to encourage browning without extended drying.
Serving Suggestions
These tenders pair well with crisp, acidic accompaniments that cut the richness. A quick slaw or pickled veg brightens the plate and balances the fried-like coating.
Offer several dipping sauces to increase appeal for different tastes and extend dwell time at the table.
- Classic honey-mustard: Mix honey, Dijon, and a squeeze of lemon.
- Sriracha mayo: Combine mayonnaise with sriracha and lime juice for heat and creaminess.
- Cool ranch: Blend sour cream with dried dill, garlic powder, and onion powder for a tangy dip.
Use these tenders in other dishes: slice and add to salads, tuck into wraps, or serve as party finger food with toothpicks and varied dips. Their versatility makes them a weeknight favorite and a reliable appetizer.
Nutritional Information
This recipe estimates about 340 kcal per serving (four tenders) with roughly 36 g protein, 20 g carbs, and 12 g fat. Exact values depend on coating thickness and oil used.
To lower calories, swap panko for a thinner crushed whole-grain cereal or air-dry coated pieces before baking. For higher protein, use leaner tenders and avoid extra oil sprays.
| Nutrient | Per Serving (4 tenders) |
|---|---|
| Calories | 340 kcal |
| Protein | 36 g |
| Carbohydrates | 20 g |
| Fat | 12 g |

For more on coating science and alternative crusts, see our Ultimate Chicken Coating Guide. If you want oven-focused tricks, check our techniques page at Oven Frying Techniques.
To understand the raw material, review the biology and culinary uses of poultry at chicken. For contrast to this method, learn why immersion oil browning differs by reading about deep frying.
Q&A
This Q&A condenses common troubleshooting points and clarifies technique choices. Use it as a quick reference while cooking.
Each answer gives a precise action you can apply immediately to improve results.
Q1: What makes oven-fried tenders close to deep-fried texture?
A1: Two main factors: structural breadcrumbs (panko) and high, dry heat. Panko preserves air pockets during baking, while high heat promotes browning reactions similar to frying.
Q2: How do I stop the coating from falling off?
A2: Pat chicken dry and follow a strict flour-egg-panko sequence. Chill briefly after coating so the binder sets. Gentle handling during transfer and flip preserves adhesion.
Q3: Can I freeze breaded tenders?
A3: Yes—freeze on a tray until solid, then bag. Bake from frozen, adding a few minutes to time. Freezing solid prevents the coating from collapsing during storage.
Q4: How do I reheat leftovers without losing crunch?
A4: Reheat on a wire rack in a 375°F (190°C) oven for 8–10 minutes. Avoid microwaving, which steams the crust and softens it.
Q5: Are there reliable gluten-free swaps?
A5: Replace flour with chickpea or rice flour and use certified gluten-free panko or crushed rice crackers for texture. Test a single tender to confirm seasoning before batch cooking.
FAQ
How long do coated tenders keep in the fridge?
Store in an airtight container up to 3 days. To preserve crispness, separate layers with parchment and reheat in the oven.
Can I use chicken breast instead of tenders?
Yes. Slice breast into even strips and consider a short buttermilk soak to maintain juiciness. Cooking time may increase slightly for thicker pieces.
Will a convection oven change the method?
Convection accelerates browning; reduce temperature by 25°F (14°C) or shorten time and monitor color closely to avoid overbrowning.
What oil works best for misting?
Neutral oils with high smoke points—like refined avocado or light olive oil—work well. Use an even mist to promote uniform browning without heavy greasiness.
Why add baking powder to the dry mix?
Baking powder creates tiny gas bubbles at the surface that expand in high heat, producing a lighter, crunchier crust similar to what hot oil achieves.
These steps and adjustments deliver consistent, crispy tenders every time. Master the small details—moisture control, panko quality, and oven airflow—and you get restaurant-level crunch without the fryer.
See also: chicken tenders


