
Sticky Stems and Tiny Hooks: Spotting Cleavers Weed Easily
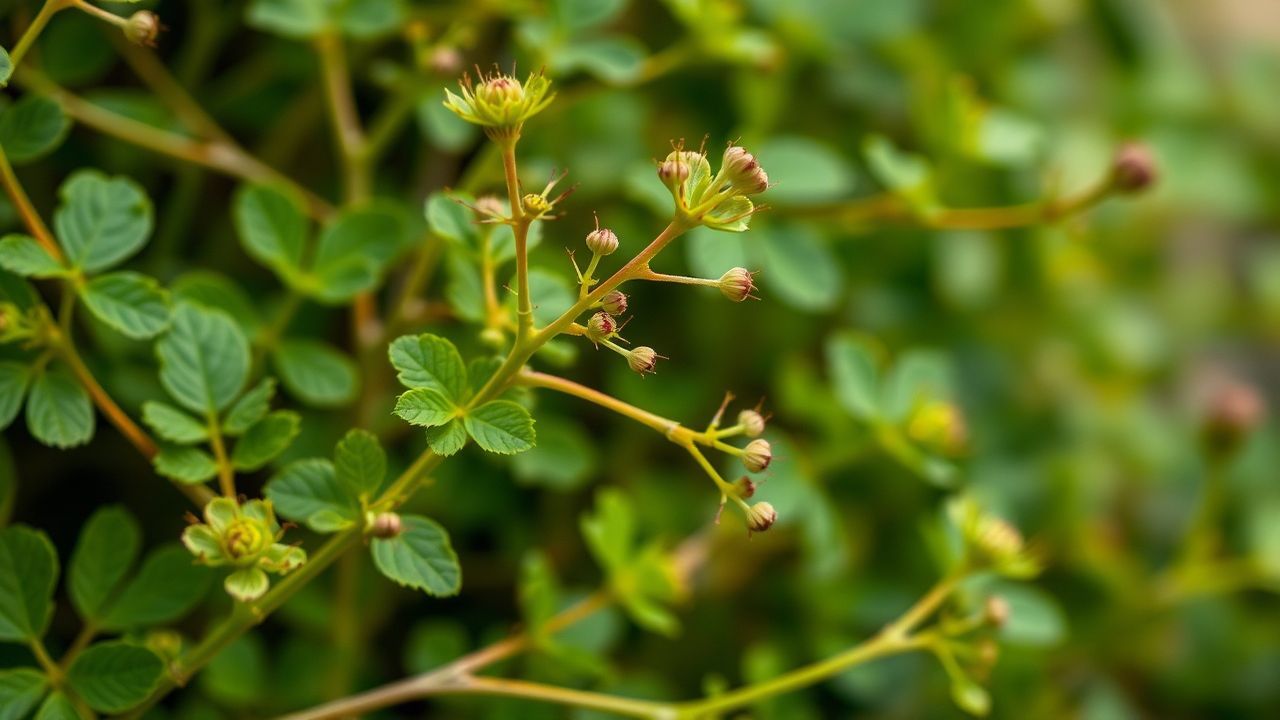
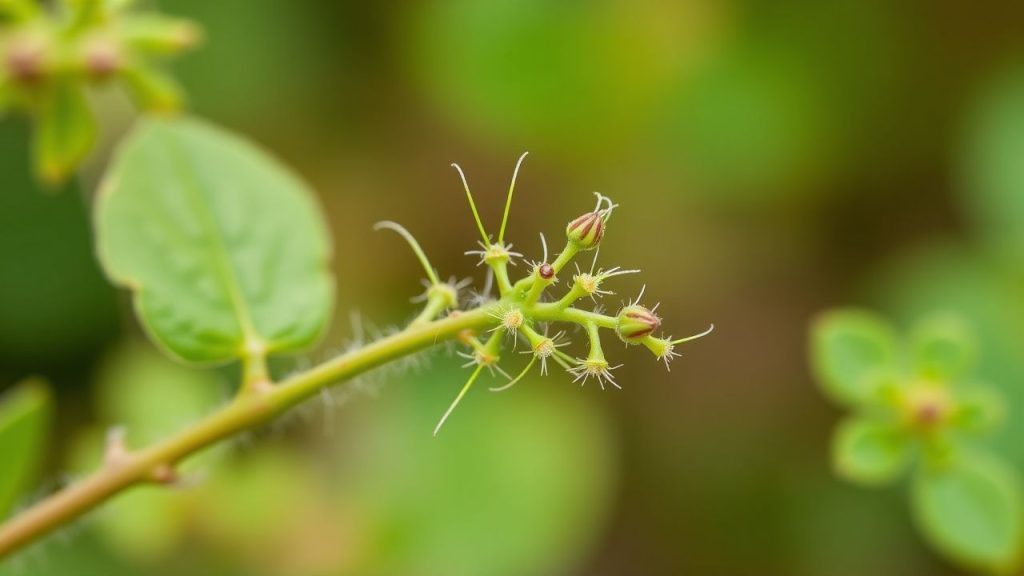
Cleavers are unmistakable once you know what to feel for: stems covered in minute hooked hairs that cling to fabric, fur and other plants. These traits let Galium aparine scramble across beds and hedgerows, creating dense mats that suppress desirable species.
- Identification cues: sticky, hooked stems and whorled leaves.
- Fast removal: pull young plants from the base before seed set.
- Prevention: use thick mulch and dense planting to deny light to seedlings.
- Control balance: combine manual removal with targeted chemical options only when required.
Identification & Preparation
Start your inspection by running gloved fingers along suspect stems; cleavers snag and pull due to hooked trichomes. Look also for leaves arranged in whorls of six to eight and small white flowers in spring to early summer.
Before you remove plants, gather protective gear and tools so you can work swiftly and avoid spreading seeds. Use sturdy gloves, a trowel for stubborn roots, and labelled bags for disposal to limit accidental dispersal.
Prep and Cook Time
This section lists estimated timing for identification and initial control so you can plan garden sessions efficiently. Time estimates vary by patch size and soil conditions, so treat these as practical targets rather than strict rules.
Identification & Preparation: 10 minutes per small bed; Removal & Treatment: 20–30 minutes per affected area; Ongoing Prevention: 15 minutes weekly inspection.
Yield
The immediate yield of consistent control is reduced competition and healthier specimen plants. Clearing cleavers frees light and nutrients to your chosen ornamentals and vegetables.
Long-term yield includes fewer recurrent weeding sessions and reduced seed bank in the soil. Over multiple seasons you should see improved germination and vigor of desirable species.
Difficulty Level
Managing cleavers rates as moderate: they are easy to uproot when young but persistent once established. Repeated action and monitoring are necessary to prevent reseeding and reestablishment.
Soil disturbance and wet, shaded sites favor cleavers, increasing control effort. Amending site conditions by improving drainage or increasing canopy cover reduces future workload.
Ingredients (Tools and Materials Needed)
Assemble the correct tools to speed removal and protect yourself: heavy-duty gardening gloves, sharp pruning shears, and a garden trowel or hoe. Have labelled bags or a disposal container ready to isolate removed material.
Optional items include a targeted herbicide for severe infestations and organic mulch to suppress germination. Use tools cleaned between beds to avoid cross-contamination.
- Gardening gloves: thick, sticky-resistant type.
- Pruning shears: for cutting dense growth.
- Trash bags or compost bin: for removed material (avoid composting infested material).
- Herbicide (optional): selective products applied per label instructions.
- Mulch or ground cover: at least 3 inches recommended.
- Trowel or hoe: for uprooting clustered plants.
Instructions
Work methodically across the infested area to avoid spreading burrs and seeds. Start at the edges of a patch and move inward so you don’t drive seeds into clean soil.
Remove plants before they produce fruiting burs; timing matters and reduces future seed bank dramatically. Repeat visits after rain events reveal new germinants early when they are easiest to remove.
Step 1: Spot the Sticky Stems
Gently brush stems or leaves with gloved fingers; cleavers cling like natural Velcro due to hooked hairs. That tactile test remains one of the fastest field diagnostics for this species.
Additionally, check for whorled leaves and small white flowers during spring. These visual cues confirm identity before you begin control tasks.
Step 2: Manual Removal
For isolated plants, grasp at the base and pull upward in a steady motion to extract the root cluster. If the soil is compacted, loosen it with a trowel first to avoid breaking the stem and leaving root fragments behind.
Bag plant material immediately to prevent burrs from moving around the site. Do not place cleavers into active compost that serves your beds; seeds survive some compost conditions.
Step 3: Mechanical and Chemical Options
For dense mats, repeated mowing or cutting can exhaust the plants by removing leaf area and preventing seed production. Combine mechanical action with hand-pulling to break up crowns and expose roots.
Reserve selective herbicide use for persistent infestations; apply according to label and site constraints. Targeted spot applications reduce non-target impacts and maintain soil biology.
Tips for Success
Frequent early-season inspections cut the work required later; seedlings are most vulnerable in their first weeks. Implement a weekly walk-through after rain to catch new patches while they are small.
Mulch acts as a passive barrier by blocking light for germinating seeds and physically hindering the low-growing seedlings. Use organic mulch and maintain a 3-inch layer to maximize suppression.
- Wear tight-fitting gloves: the hooked hairs cling and can irritate skin.
- Remove early: younger plants are easier to pull and less likely to have seeded.
- Combine methods: use manual removal and spot herbicide only when necessary.
- Monitor regularly: weekly checks after disturbance will save hours later.
After a removal session, clean tools and gloves to avoid moving burrs between beds. Store any infested debris in sealed bags for disposal or incineration where permitted.
Serving Suggestions
Once cleared, plant dense groundcovers or native shrubs to shade the soil and outcompete any stray seedlings. Dense planting reduces bare soil pockets where cleavers prefer to establish.
Create clear mulch paths and edging to limit seed movement from perimeter areas. Periodic maintenance, not one-time clearance, keeps seed pressure low and gardens productive.
| Nutrient | Benefit |
|---|---|
| Gardening Gloves | Protects hands and resists stickiness |
| Mulch | Suppresses weed growth and conserves moisture |
| Herbicide | Targets stubborn cleavers with minimal spread when used responsibly |
If you want more technical background on the species, review botanical summaries for growth habit and seed dispersal. Understanding the plant lifecycle informs the timing of control measures.
For related concepts consult references on burr dispersal and the biology of sticky plants to broaden your management options. These resources clarify why hooked hairs and burs are effective at moving seeds across landscapes.

FAQ
What exactly is cleavers and why does it cling to plants?
Cleavers is the common name for Galium aparine, a low-growing annual with hooked hairs on stems and fruits. Those hooks act as a dispersal and climbing mechanism, letting the plant scramble over neighbors to access light.
When is cleavers most visible in the garden?
Cleavers sprout in early spring and can persist through the summer, flowering in late spring into early summer. Look for small white flowers and later round, clingy burs that signal seed production.
What environments favor cleavers invasion?
Sites with cool, moist, and shady conditions, disturbed soil, and thin groundcover are highly susceptible. Dense planting and improved drainage reduce suitable niches for cleavers to establish.
How should I dispose of removed cleavers material?
Bag removed plants and either send them to municipal disposal or incinerate where allowed; avoid adding them to active compost used for garden beds. If composting, use high-heat commercial processes that reliably destroy seeds.
Are there any beneficial uses for cleavers?
Historically, cleavers has had herbal uses and limited culinary uses for young shoots, but in a managed garden it functions primarily as a weed. If you harvest, do so with caution and proper botanical identification.
The Way Forward
Cleavers is manageable when you apply consistent, pragmatic steps: detect early, remove correctly, and reduce seed return to the soil. That sequence reduces labor and minimizes the need for chemical controls over time.
Adopting a routine inspection schedule, combining physical removal with mulch and targeted spot treatments only when required, preserves soil health while protecting desirable plants. Over seasons, these tactics shift the balance in favor of your cultivated plants and away from cleavers.
See also: Cleavers weed


