
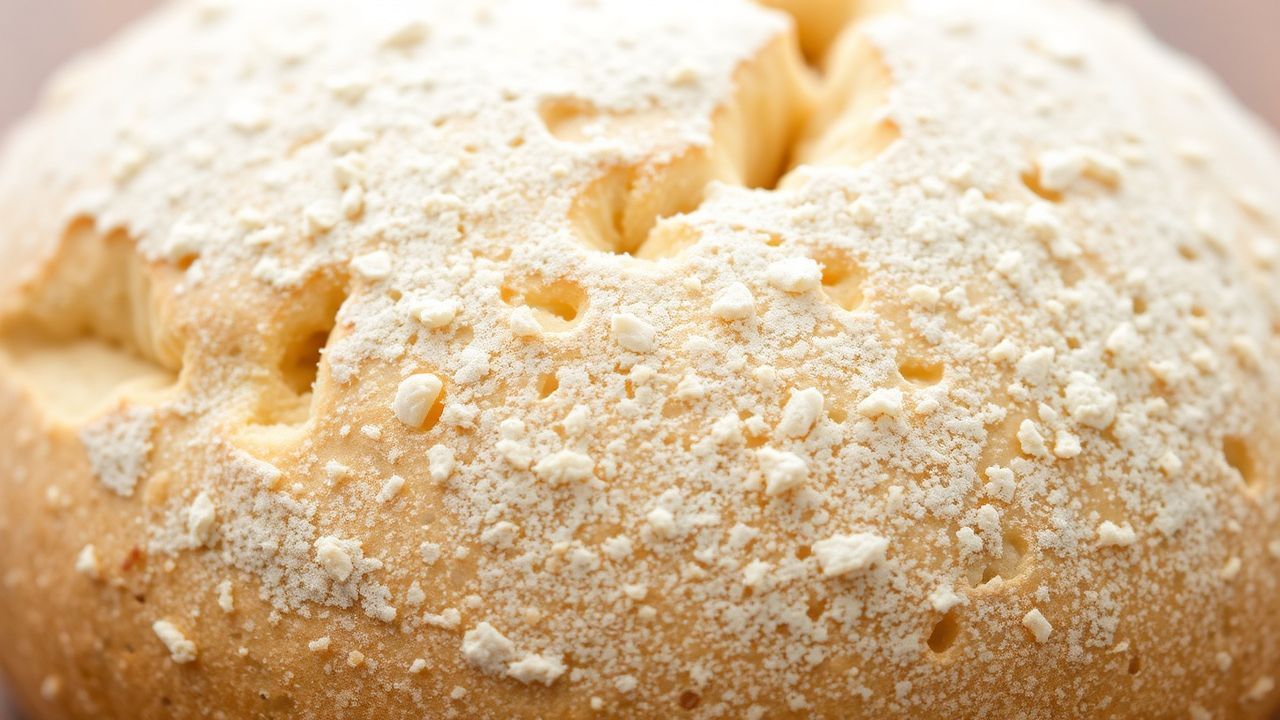
Bread crust color tells you how well the dough transformed in the oven: a pale crust signals weak browning chemistry, low surface sugars, or incorrect heat and moisture. Identifying the cause makes it possible to fix the problem predictably instead of guessing each bake.
- Oven heat and calibration: A cooler oven or cold spots block proper browning.
- Surface chemistry: Sugars and proteins power the Maillard reaction and caramelization.
- Steam and moisture control: Early steam aids oven spring; removing steam later encourages final browning.
- Simple remedies: Washes, small sugar additions, or finishing techniques rescue a pale crust.
Why bread crust color matters
Color equals flavor. When the bread crust browns fully, volatile compounds form that deliver nutty, caramel, and toasted notes. A pale crust simply lacks those aroma and taste compounds, which makes the loaf taste flatter.
The two chemical drivers are the Maillard reaction and caramelization. Both demand heat and accessible reducing sugars or amino acids at the surface; without them, the bread crust stays pale despite a well-cooked crumb.
Common causes of a pale bread crust
Heat too low or uneven. Home ovens often vary from their setpoint by 10–40°F, and cold spots will brown unevenly. An independent oven thermometer and a visual test bake reveal whether your oven is the limiting factor for the bread crust.
Insufficient surface sugars or proteins. Very lean formulas, low-protein flours, or the absence of milk or sugar reduce available reactants for browning. The result is a pale, underdeveloped crust even when the loaf is fully baked.
Insufficient fermentable sugars or proteins
Enzymes in the dough convert starches to sugars during fermentation; shorter fermentation or inactive enzymes cut available reducing sugars. The bread crust needs those sugars plus amino acids from proteins to trigger the flavor-producing browning reactions.
Simple fixes include adding a small amount of honey or malt, using a milk wash, or blending in some higher-protein bread flour. A modest change in the formula can raise the surface sugar without making the dough sweet.
Excess moisture or misplaced steam
Steam benefits oven spring early on by delaying crust set, but too much steam late in the bake keeps the surface wet and delays browning. Remove steam or vent the oven after the first 10–15 minutes so the bread crust can dry and brown properly.
Also check what the loaf sits on. A wet tray or cold parchment can leach heat from the bottom and cause pale bottom crusts. A hot baking stone or steel improves bottom heat transfer and reduces dependence on heavy steaming.
Recipe: Classic sandwich loaf with targeted browning tips
This standard sandwich loaf recipe integrates small formula tweaks and bake cues to encourage a golden bread crust without changing crumb hydration or rise dramatically. Follow the method and apply the adjustments listed in the notes.
Prep & bake — Prep: 30 minutes plus 1 hour proof; Bake: 25–35 minutes depending on oven and pan size. The key interventions live in the dough additions and early bake procedure.
Ingredients
- 3 1/2 cups bread flour
- 1 1/4 cups warm water (100–110°F)
- 2 tsp active dry yeast
- 2 tsp granulated sugar
- 1 1/2 tsp kosher salt
- 2 tbsp olive oil (optional for a softer crust)
- 1 tbsp honey or malt syrup (adds reducing sugars for better browning)
- Extra flour for dusting
- Water for producing steam in the oven
Instructions
Activate the yeast in warm water with the sugar until frothy, about 5–7 minutes. Mix the flour and salt, then combine with oil, honey, and yeast liquid until a rough dough forms.
Knead 8–10 minutes until smooth and elastic. Let the dough rise until doubled, shape, rest 20–30 minutes, and preheat the oven to a high start temperature with a pan for steam on the lower rack.
Step-by-step baking adjustments to encourage bread crust browning
Start high, then regulate. An initial blast of heat (425–475°F) helps oven spring and kicks off browning chemistry at the surface. After 10–15 minutes, lower the temperature if the top risks over-browning before the crumb sets.
Steam timing matters. Add steam in the first 10–15 minutes only, then vent or remove the water pan so the bread crust can dry and finish browning. This sequence balances oven spring with final color development.
[TI P]Expert Insight: Brushing the loaf with milk or an egg wash adds surface proteins and sugars that accelerate the Maillard reaction; milk produces a softer, darker crust while egg yields a glossy, deep brown finish.[/TIP]
Use a baking stone or steel to improve heat transfer, especially for loose loaves baked directly on the surface. For pan loaves, briefly preheating the pan increases bottom heat and encourages even browning across the bread crust.
Final color boost. To deepen color quickly, use the broiler for 1–3 minutes or raise the temperature briefly while watching closely. This method has high impact but requires attention to avoid burning the crust.
Troubleshooting and oven calibration for bread crust
If techniques and formula tweaks don’t change the crust color, the oven likely runs cool or has uneven heating. Test with an independent oven thermometer and by baking test sheets to map hot and cold zones.
Convection versus conventional. Convection fans circulate air and typically brown faster at a lower set temperature. Reduce by 20–25°F when switching modes and evaluate the effect on the bread crust.
When to adjust time versus temperature
If the interior reaches target temperature before the crust browns, raise the finishing temperature or use a short broil. If the crust darkens while the crumb remains underdone, reduce oven temperature and extend bake time for even doneness and a balanced bread crust.
Keep a baking log for each oven and recipe. Load, altitude, and ventilation alter performance; base long-term adjustments on repeated bakes rather than a single result.
Serving, storage, and preserving bread crust color
Slice only after the loaf cools to preserve crumb structure and maintain crispness. The bread crust firms as the loaf cools; slicing hot increases the chance of a gummy interior and a softer crust.
Store at room temperature in a paper bag for 1–2 days to retain crispness, or freeze slices for longer storage. To revive color and crunch, reheat briefly on a hot pan or under a broiler for 30–90 seconds while monitoring closely.
Key equipment and science references for bakers
Understanding basic gear and food science improves control over the bread crust. Read about the home oven to learn how different heat sources and cavities affect baking dynamics.
For dough biochemistry, consult the yeast entry to understand sugar production during fermentation, and the gluten page to see how protein structure influences oven spring and surface tension—both of which impact the bread crust.
Internal resources and further reading
Explore related recipes and technique guides on our site for practical tests you can run at home. Our sandwich loaf guide shows a complete workflow tuned for a consistent bread crust: bread baking tag.
For troubleshooting focused on oven behavior and recipe notes, see our equipment checklist and calibration tips here: bread baking basics. Running the same test across ovens reveals whether apparatus or technique needs the largest change.
FAQ
Why did my edges brown but the top of the bread crust stayed pale?
Edge browning with a pale top typically indicates uneven heat or positioning too low in the oven. Move the loaf to the middle rack and rotate once during the bake to even exposure and support more uniform browning.
Can I darken the bread crust without changing the recipe?
Yes. Apply a milk or egg wash, introduce steam only for the first 10–15 minutes, raise the starting oven temperature, or finish with a short high-heat blast. These techniques alter surface conditions without changing dough hydration.
Do different flours affect how the bread crust browns?
They do. High-protein bread flours and flours with natural sugars and enzymes brown more readily than very low-protein flours. Including a small portion of whole-grain flour can also deepen crust color by adding natural sugars and flavor compounds.
Is a pale bread crust unsafe to eat?
No. A pale crust is safe; it just lacks the flavor compounds created during browning. Focus on temperature, sugar availability, and steam management to develop the color and flavor you want.
Where can I read more about browning science?
Read up on the Maillard reaction and caramelization for chemistry background. Combine that reading with ovens and yeast references to connect theory to practical baking changes that improve your bread crust.
See also: bread crust
Recommended Reading:
- Maple Butter: 5 Recipes for Breakfast & Dinner
- Fluffy Biscuits: 5 Secrets for Bakery-Soft, Buttery Perfection
- 7 Irresistible Recipes Using Smoked Salt Spread That Transform Everyday Meals


