
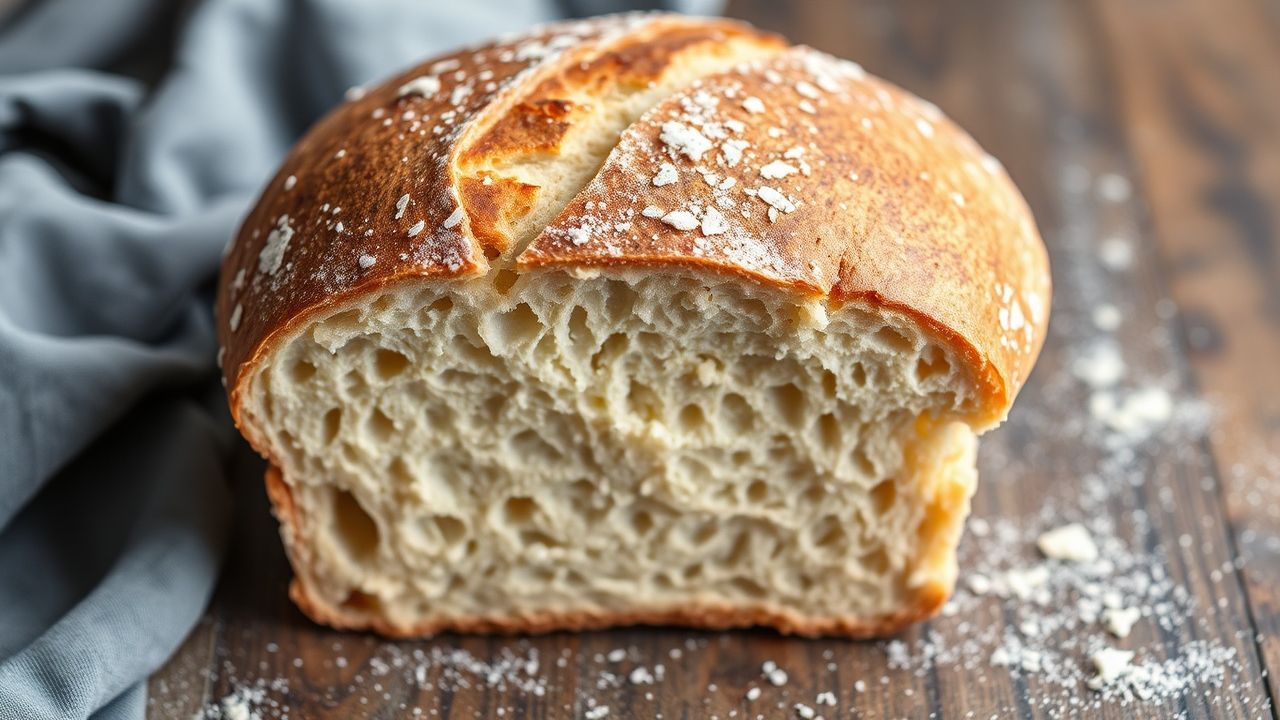
There is a quiet satisfaction in pulling a hot sourdough loaf from the oven: a crisp, caramelized crust and a tangy aroma that promises depth and texture. For new bakers, sourdough rewards attention and iterative learning; it responds to care, timing, and technique.
- Start with a healthy starter: activity beats haste. Feed, observe and schedule your bake around peak rise.
- Control temperature: fermentation speed and flavor hinge on consistent warmth or deliberate cold retardation.
- Practice shaping and scoring: structure and oven spring improve with simple, repeatable motions.
- Use steam early in bake: it preserves oven spring and creates that signature glossy, crackly crust.
Understanding Your Starter: Unlocking Natural Fermentation
A sourdough starter is a living culture of wild yeast and lactic acid bacteria that leavens and flavors bread. Observe bubbles, aroma, and rise patterns to judge health rather than relying on clocks.
Use measured feedings of flour and water to maintain a predictable schedule. For background on the biological processes, consult sourdough and fermentation overviews which explain how microbes produce gas and acids.
Starter Management: Feeding and Storage
Feed ratios affect activity: a 1:1:1 feed (starter:flour:water by weight) gives a steady schedule for many home bakers. Adjust ratio and temperature to speed or slow activity as needed.
Decide whether to keep your starter at room temperature for frequent bakes or refrigerated with weekly feedings for occasional use. Track rise time and aroma to know when it reaches peak readiness.
Mastering the Dough: Hydration, Flour Choice, and Handling
Hydration determines crumb openness and handling properties. A 68–72% hydration gives an open crumb with manageable slack for many bakers using modern flours.
Combine strong wheat flours for structure and limited whole-grain flours for flavor; use a majority of bread flour and up to 20–30% whole wheat for character. For context on protein and structure, see gluten.
Autolyse, Salt, and Strength Building
Allow a 20–40 minute autolyse after mixing flour and water to improve extensibility and enzymatic activity. Add salt after autolyse to regulate fermentation and strengthen the gluten network.
During bulk fermentation, perform gentle stretch-and-folds every 20–40 minutes for two to three rounds. These sequences develop structure without aggressive kneading and preserve gas pockets.
The Art of Proofing: Timing and Temperature Control
Proofing balances fermentation and structure. Bulk fermentation at approximately 24°C (75°F) is a common target; this temperature range promotes steady yeast activity and predictable timing.
Final proof can be room temperature for a few hours or refrigerated overnight to slow activity and concentrate flavor. Refrigerated retardation often yields improved tang and handling flexibility.
Test readiness with the gentle poke: the dough should show a soft spring back that is neither tight nor collapsed. Track time but prioritize feel and rise behavior over strict minutes.
Temperature Mapping and Adjustments
Control temperature by adjusting room environment or refrigeration. Warmer homes accelerate fermentation; lower temperatures slow it predictably.
Use a proofing box or a thermally stable spot in your kitchen for consistent results. Small changes in temperature will shift proof time significantly, so test and log results.
Scoring and Baking: Building Crust, Color, and Flavor
Scoring directs oven spring and shapes ear formation. Use a razor or bread lame and score decisively; shallow, hesitant cuts often seal and reduce desired bloom.
Bake in a preheated Dutch oven or on a baking stone with an initial steam phase to preserve surface elasticity. The trapped steam delays crust set, enabling full expansion and a crisp final crust.
Bake Profiles and Color Development
Start at high heat (250–260°C / 480–500°F) for 15–20 minutes with steam, then reduce heat to 230–240°C (450–475°F) to finish crust color and internal bake. Monitor by sound and color rather than exact minutes alone.
A hollow tap on the loaf base and an internal temperature of about 96°C (205°F) indicate doneness. Rest completely before slicing; the crumb continues to set as it cools.
Prep and Cook Time
Plan for starter upkeep and dough stages across multiple days. Active starter feeding takes roughly 8–12 hours to peak at typical home temperatures.
Bulk and final proofs vary: 4–6 hours for bulk fermentation and 2–12 hours for final proof depending on chosen strategy and temperature. Baking itself averages 35–45 minutes.
Yield and Difficulty
This formula yields one 900 g loaf, about 8–10 slices depending on thickness. Adjust ingredient weights proportionally for different batch sizes.
Difficulty: intermediate. The techniques are straightforward, but timing and feel require practice. Track variables to reduce randomness and improve consistency.
Ingredients
100 g active sourdough starter (fed and bubbly), 350 g bread flour, 100 g whole wheat flour, 320 g water (room temperature), 10 g fine sea salt.
Use filtered water if your tap tastes heavily chlorinated; chlorine can slow starter activity. Choose fresh, high-protein flour for the backbone of the loaf.
Instructions
1. Feed your starter 8–12 hours before mixing, ensuring it exhibits a peak rise and airy texture. The float test helps confirm readiness but use visual cues primarily.
2. Combine starter, water, and flours; mix until hydrated and allow a 30-minute autolyse to activate enzymes and improve dough handling.
3. After autolyse, add salt and incorporate gently. Perform a light knead or series of stretch-and-folds until smooth and slightly elastic.
4. Bulk ferment at a stable temperature, applying 3–4 stretch-and-folds over the first 2 hours. Let the dough develop until it shows visible aeration and strength.
5. Shape tightly into a boule or bâtard and place seam-side up into a floured banneton or cloth-lined bowl for final proof. Refrigerate overnight for improved flavor or proof at room temperature for 2–3 hours.
6. Preheat oven with a Dutch oven or stone to 250–260°C (480–500°F). Turn the dough out, score decisively, and bake covered for 15–20 minutes then uncovered at lower temperature to finish color.
7. Remove from oven and cool on a rack to let the crumb set fully before slicing. Cooling preserves texture and prevents a gummy interior.
Tips for Success
Starter health: feed consistently and observe rise/fall patterns. Store strategies differ for frequent versus infrequent baking; choose what matches your schedule.
Hydration control: adjust water by small increments to match flour absorption and humidity. Record adjustments; consistent scales yield repeatable results.
Serving Suggestions
Slice and enjoy with butter, olive oil, cheeses, or as an accompaniment to soups and stews. Toasted slices develop nutty flavors and a pleasant crunch.
Use slightly stale sourdough for breadcrumbs or croutons; the acidic crumb holds texture and adds depth to recipes.
Nutrition (per slice, approx.)
| Nutrient | Per Slice (1/10 loaf) |
|---|---|
| Calories | 150 kcal |
| Protein | 5 g |
| Carbohydrates | 30 g |
| Fat | 1 g |
Further Reading
Explore microbial ecology and natural leavening through reliable references such as the wild yeast entry and the general baking overview to deepen your technical understanding.
These resources support a technical approach to starter management and fermentation control for repeatable bakes.
FAQ
How do I know when my starter is ready to use?
Look for a starter that doubles in volume within its expected time window, shows abundant bubbles, and smells pleasantly tangy. The float test can help, but visual and tactile cues remain the most reliable indicators.
Can I speed up the sourdough process?
You can accelerate fermentation by raising temperature or increasing inoculation (starter percentage), but faster fermentation reduces flavor complexity and may alter crumb structure. Make controlled adjustments and document results.
What hydration should I use for a beginner loaf?
Begin with around 68% hydration for a balance of open crumb and manageable handling. Increase hydration gradually as you gain confidence with handling and shaping wetter doughs.
How do I get a consistent crust every bake?
Preheat the baking vessel thoroughly, use an initial steam phase, and avoid opening the oven during the first stage. Consistent dough temperature and proper scoring also contribute to repeatable crust quality.
What common mistakes should I avoid?
Avoid inconsistent starter feeding, under- or over-proofing, and skimping on preheating. Track variables and refine one factor at a time to diagnose problems efficiently.
See also: sourdough


