
7 Pro Tips for Classic Sourdough Bread
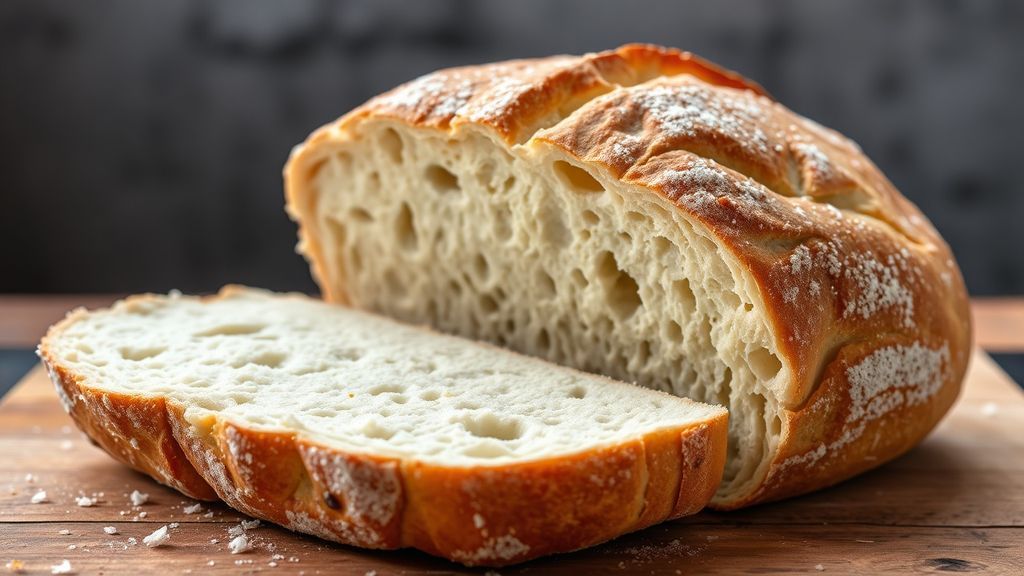
Sourdough can taste excellent even when the loaf is a little flat. For repeatable oven spring, a thin crackly crust, and a clean ear you must control fermentation, dough temperature, gluten development, shaping tension, scoring mechanics, and the steam/heat profile in the bake.
- The Classic Sourdough Bread Formula (Baker’s Percent) You Can Trust
- Method: Step-by-Step Classic Sourdough Bread With Chef’s Notes
- 7 Pro Tips for Better Oven Spring and Crust in Sourdough Bread
- Troubleshooting Sourdough Bread Oven Spring and Crust (Fast Fixes)
- Nutritional Information (Per Serving)
- Internal Link Opportunities (Plan Your Site Structure)
- Further Reading on Key Concepts
- FAQ
- Oven spring depends on trapped gas, strong gluten and correct proofing timing.
- Crust quality comes from steam timing: humid early, drier late.
- Scoring creates a hinge; angle and depth determine the ear.
The Classic Sourdough Bread Formula (Baker’s Percent) You Can Trust
Lock a baseline formula and change one variable per bake to learn what matters. Use a formula that handles predictably so you can isolate proof, shaping, or bake changes instead of guessing.
Below is a practical formula that sits in a reliable range for most high-extraction bread flours. It balances hydration for an open crumb with enough structure for strong oven spring.
Ingredients (Metric + Imperial)
Use a scale. Small hydration errors create handling differences that masquerade as starter or flour problems. This recipe assumes a 100% hydration starter.
- Bread flour: 450 g (3 1/2 cups, spooned and leveled)
- Whole wheat flour (optional): 50 g (about 1/2 cup)
- Water: 350 g (1 1/2 cups) adjusted to hit target dough temperature
- Active starter (100% hydration): 100 g
- Fine sea salt: 10 g (2%)
- Rice flour for banneton dusting: 20–30 g
Target Specs (So You Can Diagnose Problems)
Set targets to speed troubleshooting. When a bake fails, these numbers tell you whether to change fermentation time, strength-building, proof, scoring, or the bake environment.
Total hydration: ~70%. Desired dough temperature (DDT): 24–26°C (75–79°F). Prefermented flour: ~10% from starter.
Method: Step-by-Step Classic Sourdough Bread With Chef’s Notes
This workflow uses an autolyse, early strength-building during bulk, and a cold retard for flavor and scoring control. It fits a day/evening schedule: mix and bulk during the day, retard overnight, bake next morning.
Each major step below includes quick cues so you can judge by feel instead of clock time. Feel becomes reliable once dough temperature and formula are consistent.
1) Build or Refresh the Starter (Same Day)
Feed your starter so it peaks near mixing time. A ready starter is domed, well-aerated, and smells mildly lactic or fruity rather than solvent-like.
Starter used well past peak tends to be more acidic and proteolytic, which softens dough structure and reduces lift. Time your last feed so the starter is at peak activity when you mix.
2) Autolyse (30–60 minutes)
Mix the flours with 320 g of the water until no dry flour remains. Cover and rest. Autolyse hydrates starch and begins gluten alignment with little oxidation.
Autolyse often makes a 70% dough feel calmer and stronger, and it reduces the number of folds you need later to reach good strength. For background on the process see autolyse.
3) Mix: Add Starter + Salt
Add 100 g starter and incorporate. Dissolve the 10 g salt in the remaining 30 g water and add. Mix until the dough becomes smoother and slightly resistant to stretching.
If your flour is low-protein or the room is warm, hold back a splash of water. It is easier to add small amounts later than to rescue an over-hydrated slack dough.
4) Bulk Fermentation (3–6 hours at warm room temp)
Bulk ferment covered at 24–26°C (75–79°F). During the first two hours perform 3–5 sets of coil folds or stretch-and-folds, spaced 20–30 minutes apart.
Stop folding once the dough looks satiny, holds its edges, and resists spreading. Excess folding late in bulk can deflate the larger gas pockets you want for oven spring.
Bulk Fermentation Cues (What You’re Looking For)
Use the clock as a guideline; decide by dough behavior. End bulk when the dough has risen roughly 30–60%, looks slightly domed, and jiggles when the tub is shaken.
A very foamy, fragile dough is likely past its strongest point. If that happens, shorten bulk next time or chill earlier to preserve structure.
5) Pre-shape + Bench Rest (15–25 minutes)
Turn the dough onto a lightly floured surface and pre-shape into a loose round. Rest seam-side down until the dough relaxes and spreads slightly.
This rest makes final shaping easier: relaxed gluten lets you build outer tension without tearing the skin during the final form.
6) Final Shape + Cold Proof (8–16 hours)
Shape into a boule or batard, creating a tight outer skin around the gassy interior. Place seam-side up in a rice-floured banneton and refrigerate 8–16 hours.
Cold proof firms the dough for cleaner scoring and makes expansion more predictable in the oven. It also deepens flavor through slow fermentation.
7) Bake: Preheat, Steam, and Finish Dry
Preheat a Dutch oven (or stone/steel with steam) to 260°C (500°F) for 45–60 minutes. Score cold dough and load immediately.
Bake covered 20 minutes, then uncover and bake 20–25 minutes at 232°C (450°F) until deeply browned. Vent briefly if crust softens to encourage crackle. For context on ovens and heat transfer see oven.
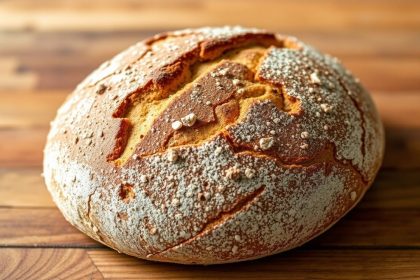
7 Pro Tips for Better Oven Spring and Crust in Sourdough Bread
Oven spring happens in the first phase of baking before the crust sets. It’s driven by trapped gases, residual yeast activity early in the bake, and steam delaying crust set.
Crust texture requires early humidity to gelatinize surface starch and late dryness to drive off moisture. Time both phases precisely for a thin, crackly crust.
1) Time Your Starter for Strength, Not Excess Sourness
Use starter at or just before peak to get the best lift with balanced acidity. Peak timing preserves dough strength during bulk fermentation.
If your starter peaks too quickly, change feeding ratios or schedule so it lines up with your mix time. Consistent starter behavior equals consistent fermentation.
2) Control Dough Temperature (DDT) With Simple Math
Dough temperature controls fermentation speed. Use water temperature to steer the final dough temperature into 24–26°C (75–79°F) so bulk behavior becomes predictable.
Once your DDT is consistent, fermentation cues become more meaningful. Track temperature with an instant-read thermometer for reliable results.
3) Build Strength Early, Then Leave It Alone
Do folds during the first half of bulk when gluten organizes efficiently and the dough tolerates handling. Stop late handling to preserve large gas pockets.
If a dough stays slack late in bulk, treat that as a signal to adjust hydration, flour protein, or fermentation timing next bake rather than folding more now.
4) Shape With Real Surface Tension (Without Tearing)
Surface tension converts expansion into height. A well-shaped loaf feels like a taut outer membrane that holds a gassy interior and pushes the bread upward in the oven.
Use minimal flour when shaping and a bench knife to drag and tighten the skin incrementally. If the skin tears, rest briefly and tighten again more gently.
5) Proof for the Bake You Want (Use the Finger Dent Test Correctly)
Underproofed loaves tend to burst at weak spots; overproofed loaves spread and scores seal. Aim for a dough that holds shape, is aerated, and shows a slow-springing finger dent that leaves a slight impression.
Cold dough can feel stiffer than it is; confirm with multiple cues: visible rise in the banneton, aerated edge, and a smooth, slightly puffy surface.
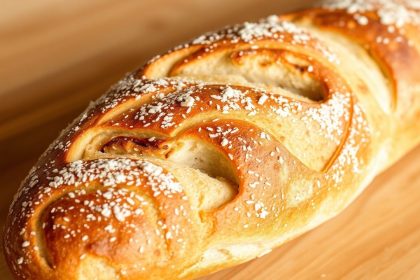
6) Score Like You’re Creating a Hinge
Score one main cut 1–1.5 cm deep at a 25–35° angle with a decisive stroke. The shallow angle creates a flap that lifts and caramelizes into an ear.
Score immediately before loading so the cut doesn’t seal. Cold, retarded dough usually scores cleaner and holds definition during the first minutes of baking.
7) Steam Early, Then Vent Late for Crackle
Steam delays crust set and allows the loaf to expand freely. Dutch ovens create a humid microclimate that gelatinizes surface starch for shine and thinness.
After the spring phase, switch to a drier environment. Uncover, finish with deep color, and vent at the end to encourage a crisp, crackling crust.
Troubleshooting Sourdough Bread Oven Spring and Crust (Fast Fixes)
Most issues fall into four buckets: fermentation timing, dough strength, scoring mechanics, or bake environment. Troubleshoot in that order and change only one variable per bake.
Photographs of the loaf profile, crust, and crumb speed diagnosis. Note dough temperature, folding count, and proof time with each bake to find patterns quickly.
Low Oven Spring: Common Causes
Overproofing is the top cause of low spring. A dough can look gassy but lack the structural reserve to lift once heat hits; shorten bulk or chill earlier if this happens.
Weak structure is the next common cause: flour that can’t support hydration, too much water, or insufficient early strength-building. Adjust hydration or flour choice to match your process.
Thick or Tough Crust: Common Causes
A thick crust often results from insufficient early steam or excess surface flour that dries the skin. Use stronger steam in the first 15–20 minutes.
Finish uncovered with more color to drive off residual moisture. If crust softens after bake, cool fully on a rack so internal steam escapes before slicing.
Nutritional Information (Per Serving)
Estimations assume a ~1 kg loaf sliced into 10 servings using the ingredients above. Values vary by flour brand, hydration, and slice thickness.
Calories: ~190 kcal. Carbohydrates: ~38 g. Protein: ~6 g. Fat: ~1 g.
Internal Link Opportunities (Plan Your Site Structure)
Place internal links where readers need the next step—right when a concept becomes actionable. Use a cornerstone page titled “Sourdough Bread” and support it with focused how-tos.
Suggested internal anchors: starter feeding schedules and peak timing guide and shaping for boules vs batards. These give readers immediate next steps and improve dwell time.
Further Reading on Key Concepts
For foundational concepts consult reference pages that explain fermentation, gluten, and autolyse in depth. These pages clarify the science behind the practical levers you’ll adjust in the kitchen.
Recommended references: sourdough, gluten, and bread.
FAQ
Why does my loaf open at the score but not lift?
This usually reflects fermentation timing or weak structure. Overproofed dough can open at the score but lack upward energy.
End bulk when dough shows a 30–60% rise, feels satiny, and jiggles; then shape with firm surface tension so the score becomes the preferred expansion path.
How do I get a thinner, crispier crust?
Increase steam early and dry the bake late. Covered baking or added steam for the first 15–20 minutes gelatinizes the surface starch for shine and thinness.
Finish uncovered with deeper color and vent briefly at the end to encourage a crackling final crust. Cool fully before slicing.
What’s the best scoring angle for an ear?
Score at a 25–35° angle about 1–1.5 cm deep with a decisive stroke. The shallow angle creates a hinge that lifts into an ear during spring.
Score cold dough right before loading so the blade glides cleanly and the cut holds definition in the first minutes of the bake.
Can I get good oven spring without a Dutch oven?
Yes. You only need to trap steam early. Use a preheated stone or steel and add steam via a tray of water, or cover the loaf with an inverted roaster for the first phase of baking.
Vent after the spring phase to dry the crust and finish with strong color. The same steam-timing principle applies whether you use a Dutch oven or steam tray.
Why is my crumb gummy when the crust looks done?
Gummy crumb usually means underbaking or slicing too soon. Color is a guide but internal temperature is more reliable.
Bake until the center reaches about 96–99°C (205–210°F) and cool completely before cutting to allow the crumb to set.
See also: sourdough


